My very own total Eclipse…..

When I got back from the UK just after Christmas I set about installing the new Eclipse-8 battery monitor on the Capo. You may remember from a previous post that I fitted a 5mm LED battery monitor from Sparkbright a few month ago and loved it (previous post here). In December Andrew very kindly sent me an Eclipse-8 as a sample so I could evaluate it – thanks again Andrew!

Aprilia Caponord ETV1000 Rally-Raid - Sparkbright multi-state auto dimmng battery monitor

What’s the difference between them? Well firstly, it’s only available as an 8mm or 10mm unit, no 5mm version as yet. Secondly – and this is the kicker – it’s also auto-dimming, changing it’s brightness depending on the prevailing light conditions, without using a separate photo-sensor to do it. Here’s a Sparkbright video of it in action.


So does it work? Short answer – yes, VERY well! I installed it in the same place I’d had the 5mm unit, just drilling the hole a little bigger to accommodate it. The Eclipse-8 has the circuit board attached directly to the LED, so only two wires and no circuit board in the loom to find a home for. The board is very compact and once the LED is inserted into the mounting clip, it is hardly visible. The length of wire supplied was ample to attach to the battery and earth points I chose in the bikes wiring.

The Caponord was bolted back together and fired up, the LED quickly changing from orange to green as the rec/reg did its thing and the voltage rose in the loom. In the strong daylight of the barn the LED glowed brightly, but put a hand over it and it very quickly dropped its output in response. All well and good, but would it be effective when put to use in the real world?

Well I’ve covered about 700 miles through January and early February in all weathers and lighting conditions and the Eclipse-8 has certainly lived up to my expectations. For example, here along the Adriatic, the A14 Autostrada weaves its way along the cost through numerous dimly lit tunnels. Jumping from bright sunlight to twilight and back gives the unit a good workout and each and every time it switches very rapidly – I’m guessing in a few milliseconds, but certainly fast. At night-time the unit operates primarily at it lowest output and is never distracting, sometimes increasing in  brightness as I pass under a sequence of street lamps just to let me know it’s still doing its thing!

So are there any downsides? Yes, but not as a result of anything done by Sparkbright. 8mm LED clips it seems are only available in convex and not concave style. Great for increasing the angle of visibility ( not important from the saddle) but also increasing the susceptibility of the LED to being ‘washed-out’ by direct sunlight and becoming difficult to see. As it is, there is a simple partial fix. Drop the LED further down the clip and glue it in place. I dropped the LED so its top was flush with the clip – a couple of millimetres I guess and this has made a world of difference. Now only the most direct sunlight affects readability and I can live with that!

Bottom line, the Eclipse-8 is a simple all-weather battery monitor for day/night use on a motorcycle – no more, no less. And it is doing the job perfectly.

Contact details  E-mail: andrew@sparkbright.co.uk    or  Tel: 0141 557 5277

Other than my initial purchase of the 5mm unit and sample Eclipse-8 supplied by Sparkbright, I have no affiliation to them. I’m simply offering my own review of products I believe to be useful and cost effective. It’s my unbiased opinion, if you buy one and don’t like it – tough. Don’t come running to me! Is that a disclaimer?

New page added – Rear Suspension Linkage

Aprilia Caponord ETV1000 Rally-Raid - 3D Rear suspension linkageYes, a new page added under ‘Chassis’ in the drop-down menu after installing the Brucaliffo supplied rear suspension linkage overhaul Kit. An excellent and comprehensive kit of parts and tools. I adapted it slightly from the original documented installation procedure (available here in Italian), nothing too radical though.

There is a slight issue with the alignment of one bearing, but it’s not a problem ….. and it’s all explained on the new page! I hope you find it useful.

You are what you are

Someone close to me once said;Birthday card from Giu & family

“You’ll never be riding motorbikes when you’re 30”

A simple statement I’ll grant you, but among the endless conversations that spiralled into arguments, the tone of voice, the inflection and the derisory look, all combined to weld that moment into my mind for eternity.

Today I am 50 …… I first rode a motorbike at 7. I’ve had my licence for 34 years and been lucky enough to earn a living from riding one for over 50% of that time. 7 accidents, over 50 bikes,  and ridden almost 946,000 miles in all weathers and through many wonderful countries.

Today, I think am a biker.

Yep, who would have believed it … I’m 50. More to the point, I’ve made it to 50! It only seems minutes ago I was sitting at home reading ‘On Two Wheels’, a sweaty-palmed teenager eager for life to get a move on. But it was in my late 20’s that the innocuous statement was made ….. what did she mean? As a full-time dispatch rider I wasn’t going to survive? Or that I had no conviction in anything I did? She certainly didn’t believe I was much good at anything. As a rider I was an accident waiting to happen in her eyes, so I took my ‘Institute of Advanced Motorists’ test and passed first time – but the bar was simply raised in her mind.

I think it’s fair to say that praise didn’t come easily, hell, it never really came at all. But I plodded on. Over the years I became a professional rider, earning a living from the one thing I love doing ……. I was still never good enough though. In the end, we parted our ways and life went on. Our paths haven’t crossed in the past 15 years and it’s now 12 years since I qualified as a motorcycle instructor and 5 years that the Capo and I have worked together.

Mother, you were wrong then, you’re still wrong now …….

 I am Karl Robert Bianchini.  Today I am 50.  Today I am a biker, I always was and always will be. I think I’ve earned that right.

Aprilia Caponord ETV1000 Rally-Raid - moto-abruzzo January 2013

Dash it all Jeeves…..

Aprilia Caponord ETV1000 Rally-Raid - Dashboard green LCD panelsWell here it is at last ….. the green LCD Caponord instrument panel. A hot brew and an early start on a cold wintery day, had the panel off the bike and in the warm workshop by 8am. While the soldering station warmed up, I separated the cases, eased the needles off and surprised myself that all this only took a couple of minutes – no hassle with the needles at all, which is unusual!

Aprilia Caponord ETV1000 Rally-Raid - Dashboard LED's to replace
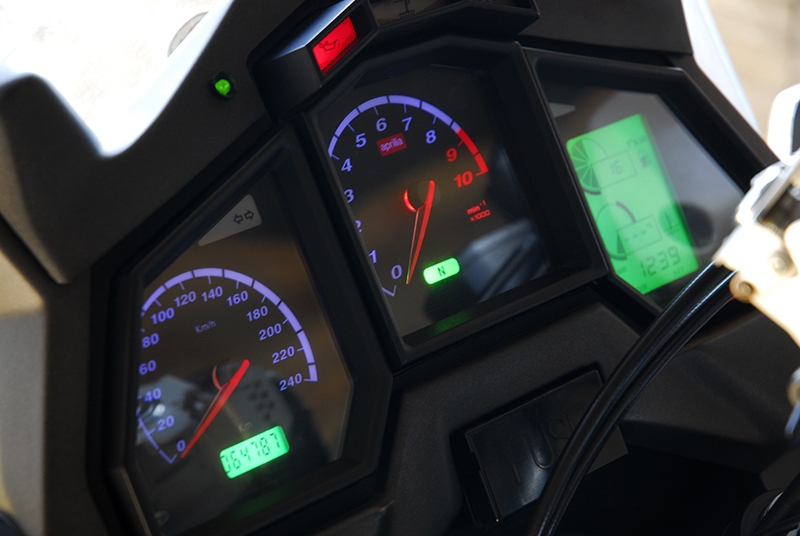
Next, the six diagnostic panel  and two odometer blue LED’s were replaced with green versions, this isn’t difficult but you need to make sure they go on the right way round or they won’t work! The LED specification I used is:

3.2-3.8v 20ma 1000mcd green PLCC-2 SMD LED

Then I removed the old 24C02 chip and read off the data and saved it. I modified the file and wrote it to a new chip and soldered it in place. Back out in the cold I plugged the board into the bike and got ready to switch on. Would it, wouldn’t it ….. blingy lights or a puff of smoke? Hoorah – we have bling!!! The case was buttoned back together after giving the clear lens a clean and checking the rubber seal was OK. All in all, about an hours work, time for another brew then.

So is it just a bling-thing or is their anything worthwhile about changing the LED’s? Personally I prefer it in green, the contrast between digits and background is better making it easier to read the display on the move – sadly the photographs don’t reflect how good they really are. Also the green LED’s are brighter than the blue and that certainly helps. Keeping the blue LED’s behind the analogue gauges adds a nice touch, balancing out the green.

Who’s bright idea?

Diagnostic panel LED replacementYes I know, I keep fiddling with this damn board …… but my new green LED’s turned up today!

So in one went on the test board to see what it looks like. The pic doesn’t do it justice as the green is a little deeper and more vibrant. The idea is to replace the LED’s under the diagnostics panel (x6) and the odometer (x2) and keep the meter lighting in blue.

I quite like the look of it, so tomorrow the RR instrument panel comes out of the bike and all the work I have lined up for it begins … please don’t let me screw up!

DVLA data

Aprilia Caponord ETV1000 Rally-Raid - DVLA register of taxed/SORN bikes
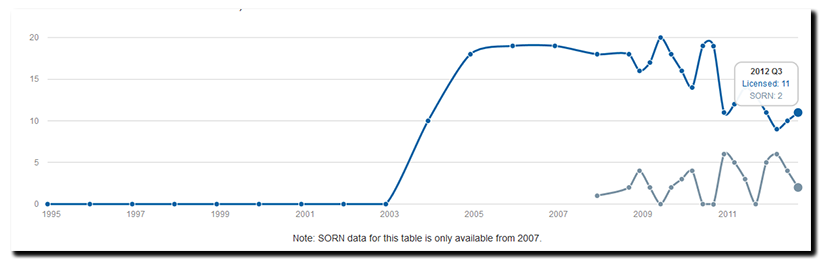
Well here it is …. the third quarter data for 2012. Including mine (August 2012), the UK has a total of 13 registered Caponord Rally-Raids – that’s a loss of three in the last year. Will 2013 see us drop into single figures? For those not familiar with UK registration, SORN means “Statutory Off-Road Notice” ….. in other words the owner has declared the bike will not be used on the highway, so probably garaged, untaxed and stored for winter. Hence the seasonal fluctuation you see on the graph.

So how about the standard Caponord? Well, 293 are registered altogether, 5 more than the end of 2011 …… ‘new’ old-stock or imports? I wonder.

If you want to see how many of your favorite car or bike are still registered in the UK then pop over to: http://www.howmanyleft.co.uk/

Chips with everything

And a Happy New Year to one and aAprilia Caponord ETV1000 Rally-Raid - Test gear switch boxll. Welcome to 2013 ….. and have I been a busy boy over the festive period.

The Caponord/Futura instrument panel simulator-rig thing is built and working, allowing all the functions to be tested and it will plug directly into my main loom/ECU simulator when I get round to finishing it. I also piggy-backed a neat socket for the 24c chip onto the programmer and so now I can test a board and reprogram it all in one location.Aprilia Caponord ETV1000 Rally-Raid 24C02 EPROM Programmer

A nice new solder station (thanks Lucy!) with better heat control has made working on the boards a breeze and a ‘Chipquik’ SMD removal kit’ has made chip replacement so easy compared to a couple of weeks ago. Working on stuff this small is certainly challenging!

So what’s left to do with these boards? Nothing much, finish the circuit diagram and replace some of the back-light LED’s as an experiment and trial a built-in  Sparkbright battery monitor. Stay tuned!

A little light circuit training

Aprilia Caponord ETV1000 Rally-Raid - Dashboard large LCD panel
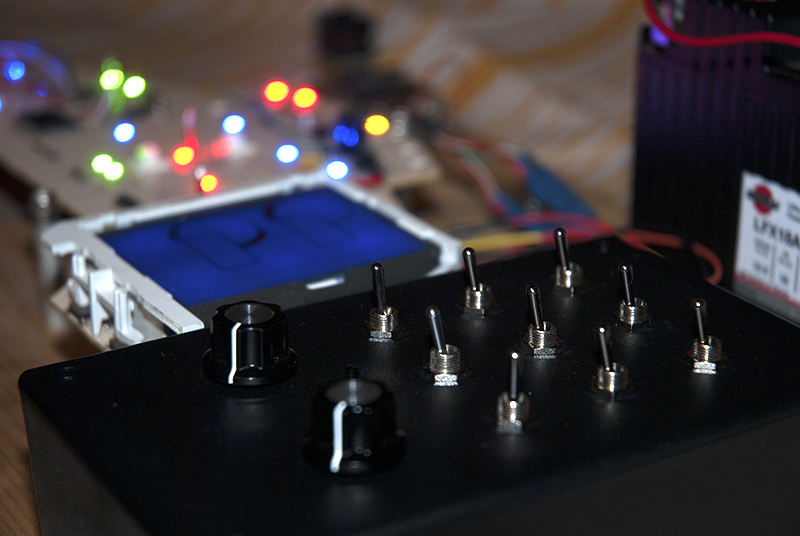
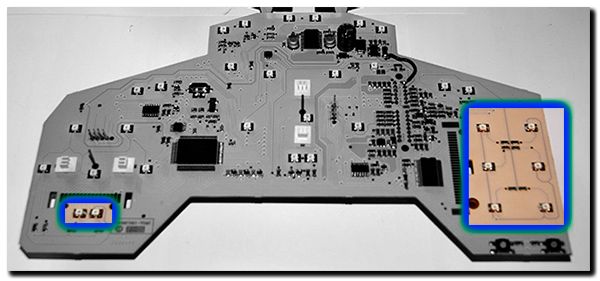
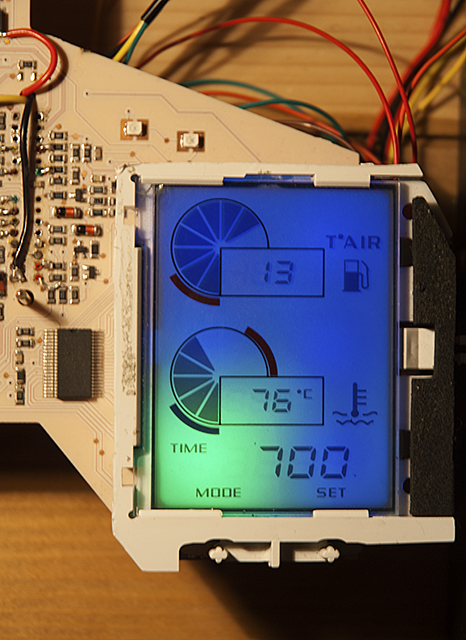
On a previous post I mentioned a visit by Mike081. During his stay I said that I’d like to get hold of another instrument panel at some point, so I could look into the circuit and programming in more detail. It just so happened Mike had a board lying around and he promised to sent it over. Well, true to his word, a Mk2 Caponord board was sat on the post-box when I got back home the other day. Cheers Mike!

First, I made a stand to support the little beauty while I prodded and poked around withAprilia Caponord ETV1000 Rally-Raid - AutoCAD circuit layout my trusty multimeter. The next job was to try and fix it! The board had a couple of problems, a high resistance track and faulty regulator but nothing too taxing. Next up, I photographed the front (high resolution pic here) and back, then imported them into AutoCAD and started the tedious task of unravelling the tracks and components (click on pic).

Next up, the EEPROM. The little memory chip that contains settings and data relevant to the running of the board and recording of mileage and trip.

Aprilia Caponord ETV1000 Rally-Raid - dashboardTwo AF1 forum members – Michele (MCR) and Andy (Beasthonda) have been forefront in unravelling the data on the chip and how it alters the way the board works. The bottom line is that instrument panels from both the Caponord and Futura can now be reprogrammed in various ways and used on either bike. This also means that the ability to safely recover boards that have reset to factory default is now possible.

I’d like to thank both Andy and Michele for including me in the email exchange and for sending data and documents so I can better understand the particular settings for each bike – Cheers gents, you’re the best!

So this week I’ve experimented with the alternative settings and sure enough my little board has changed from Caponord to Futura and back and dabbled in metric and imperial measurements and even been a hybrid – Caponord with Futura LCD display and Speedo/Tacho calibration.

Aprilia Caponord ETV1000 Rally-Raid - dashboard

Low voltage battery warning LED

Aprilia Caponord ETV1000 Rally-Raid - voltmeter in right hand fairingI’ve already got a voltmeter in the right hand fairing and although I wouldn’t be without it, I have to say it suffers from a  couple of drawbacks.

  • Poor readability in very bright daylight (Blue LED display)
  • Low down in the fairing, so requires eyes to be diverted from the road ahead.
  • I also have to lean forward a little to see over the hand-guard/brake master cylinder.

Aprilia Caponord ETV1000 Rally-Raid - Sparkbright battery monitorSo I decided I wanted something more in my eye-line, something that simply displays as a go/no-go indicator, something simple; and it looks like SparkBright have just the solution. A neat encapsulated circuit feeding a Tri-state LED that will display a different colour depending on the system voltage. Now my peripheral vision should quickly spot a change in the Caponord system and give me ample time to take action. Here’s a table that explains the various states of the LED at different voltages.

 The package can be supplied with LED sizes of 5mm/8mm or a whopping 10mm. I chose the 5mm as it will match the one I already have in place for the Autoswitch AS7 (fog lights).  Before ordering I had a couple of questions and sent off a quick email – bear in mind this was a Sunday morning. Before I could even read through the Sunday funnies, Andrew Ferguson owner and guiding light behind SparkBright had replied – now that’s dedication! the bottom line – It does what I want and it’s waterproof, ideal for motorcycle use then!

Anyway, long story short, Andrew agreed to make a change to the mounting clip for the LED (at no extra cost – see gallery below for clip differences) and also told me of an exciting new development just around the corner for this product; auto-dimming built right into the LED for the 8mm and 10mm options. Sadly it won’t be available on the 5mm version for some time to come. However, this bit of technology is something the Capo is aching for on the Autoswitch Red/Green LED (fog lights) I already have fitted. By day it’s fantastic, but by night it’s just a little too bright.

Aprilia Caponord ETV1000 Rally-Raid - dashboard with AS7 Autoswitch LED and Sparkbright battery monitor

LED symmetry. Hopefully !!

So I’ll wait for Andrew to send this unit and if it does what I need of it, I’ll no doubt upgrade to the 8mm auto-dimming version and retro-fit this one to my tractor ….. about time I dragged it screaming into the 21st century. And maybe if I ask nicely, he may be able to help me upgrade the Autoswitch LED as well!

You can contact Andrew direct at andrew@sparkbright.co.uk or bookmark www.sparkbright.co.uk (website should be up and running by the last week of October). You’ll also find them on Ebay, just search for “12v battery warning light”. The cost? £11.80 including P&P (UK) as of 21st October 2012.

  I’ll finish by saying I have no affiliation or involvement with Andrew other than as a customer – I just like the product!

TuneECU update

Not a major update, more a bug fix and more Triumph map support added. TuneECU is still the ECU software of choice for the Aprilia Caponord and hasn’t added any new features for us since the beginning. Each new version has primarily focused on new Triumph models and addressed a few minor bugs – only one of which has been relevant to the Caponord so far.

I do like to load the new versions and compare functionality with an older trusted version just to make sure that nothing untoward has crept in with each new release as far as the Capo is concerned. Oh and as I write this, I’ve just realised – it was two years ago this month that the Caponord/Futura were added to the bikes that TuneECU support ….. wow time flies! To download the new version and maps, click on the ‘TuneECU’ link on the menu bar.