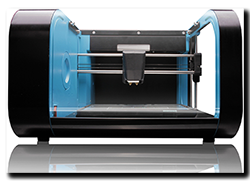
 Yesterday, on a rather cold and wet afternoon, moto-abruzzo took a step into the future ……. courtesy of a good friend that I’m doing a project for. A 3D printer arrived! And being the top man that he is, he’s cool about me printing off those odd little Caponord bits-n-bobs.
It was rapidly unpacked and Jan and I stood in awe at this little box of awesomeness, we oooo’d and aaaah’d in all the right places …. then it was time to fire the beast up. But first a good nights rest. Early the next morning I loaded up a model and hit the ‘MAKE!’ button. My heart pounded as it hummed, rumbled and whired into action. For an hour it beavered away – then stopped dead! In fact everything stopped – ANOTHER BLOODY POWER CUT! So on with the coat and off to buy a UPS (Uninterruptible Power Supply) to keep computers and printers running when we get these annoying micro/mini power cuts that last no more than a second or two but mess everything up. Once installed I was away like a whippet on speed ……. by the end of the evening we  stood and marvelled at its first creation – A Mk1 speedo sensor case.
Like any piece of kit it has a bit of a learning curve attached to it, but hey, that’s all part of the fun. Here’s a pic of the first printed Capo speedo sensor main case and cap. The holes print really well even at this resolution and tap to M3 no problem. The sensor is a nice snug fit and (thankfully!) it fits in the brake caliper carrier and even the bolt lines up which is nice! So overall – moving in the right direction. Now I just need to order a couple of sensors, some cable, rubber boots and Molex connectors and the jobs as good as done. Then I can change out the sensor on the bike, run it around for a while and see how the printed parts hold up to life on a motorcycle.
Why bother with all this?
Have a look at the cost of a replacement sensor from Aprilia (AP8124985) ….. currently £112 plus postage from Fowlers and Ultimateparts in the UK and €146 (approx. £127) from wendelmotorraeder in Germany. OK it’s much cheaper from AF1 at £65 but the postage is higher and you may well have customs duty to pay – all bumping up the cost.
So …….. IF (a big ‘IF’ mind you) it tests OK over a couple of months and possibly a small batch were to be made, would anyone be interested in an aftermarket Capo speedo sensor for half the price of an original?
Anyway, until then what’s next ……. hmmmm.
- Hybrid velocity stacks – Caponord height with Futura diameter (51mm)
- Hi-Flo airbox snorkel
- Frame/axle/crash bar bungs (insects use the orifices as nesting sites!)
- ……. and maybe even a 1:5 scale model!! 😀
 I’ve been carrying six spare spokes around in the front wheel spindle for years ….. however the whole thing was a bit of a mash-up and not worthy of a post on here unless I desperately wanted some serious ridicule. Until now that is! Out with the hand-cut foam and insulating tape and in with the nice new 3D printed parts – two spacers to hold the spokes all nice and even and two new symmetrical end caps. All this held together with a length of 8mm aluminium tube, two ‘O’ rings and two M6 stainless fasteners topped off with a pair of decorative washers I had left over from my old Honda Blackbird days. All works pretty well, even if I say so myself! 😀


 fuse block") Unfortunately, due to circumstances I won’t elaborate on just yet, I found myself with a bunch of cut accessory cables sorely in need of a home! So step forward front-and-centre the fuse block made by Beasthonda (Andy) from the
Unfortunately, due to circumstances I won’t elaborate on just yet, I found myself with a bunch of cut accessory cables sorely in need of a home! So step forward front-and-centre the fuse block made by Beasthonda (Andy) from the 


 And that’s it …… one neat block and no more external fuses.
  I had a bit of a stress-monster moment last night. After finishing off a bit of work on the Capo, I fired it up and stuffed the multimeter probes across the battery terminals –