
Well, it’s over ………………..
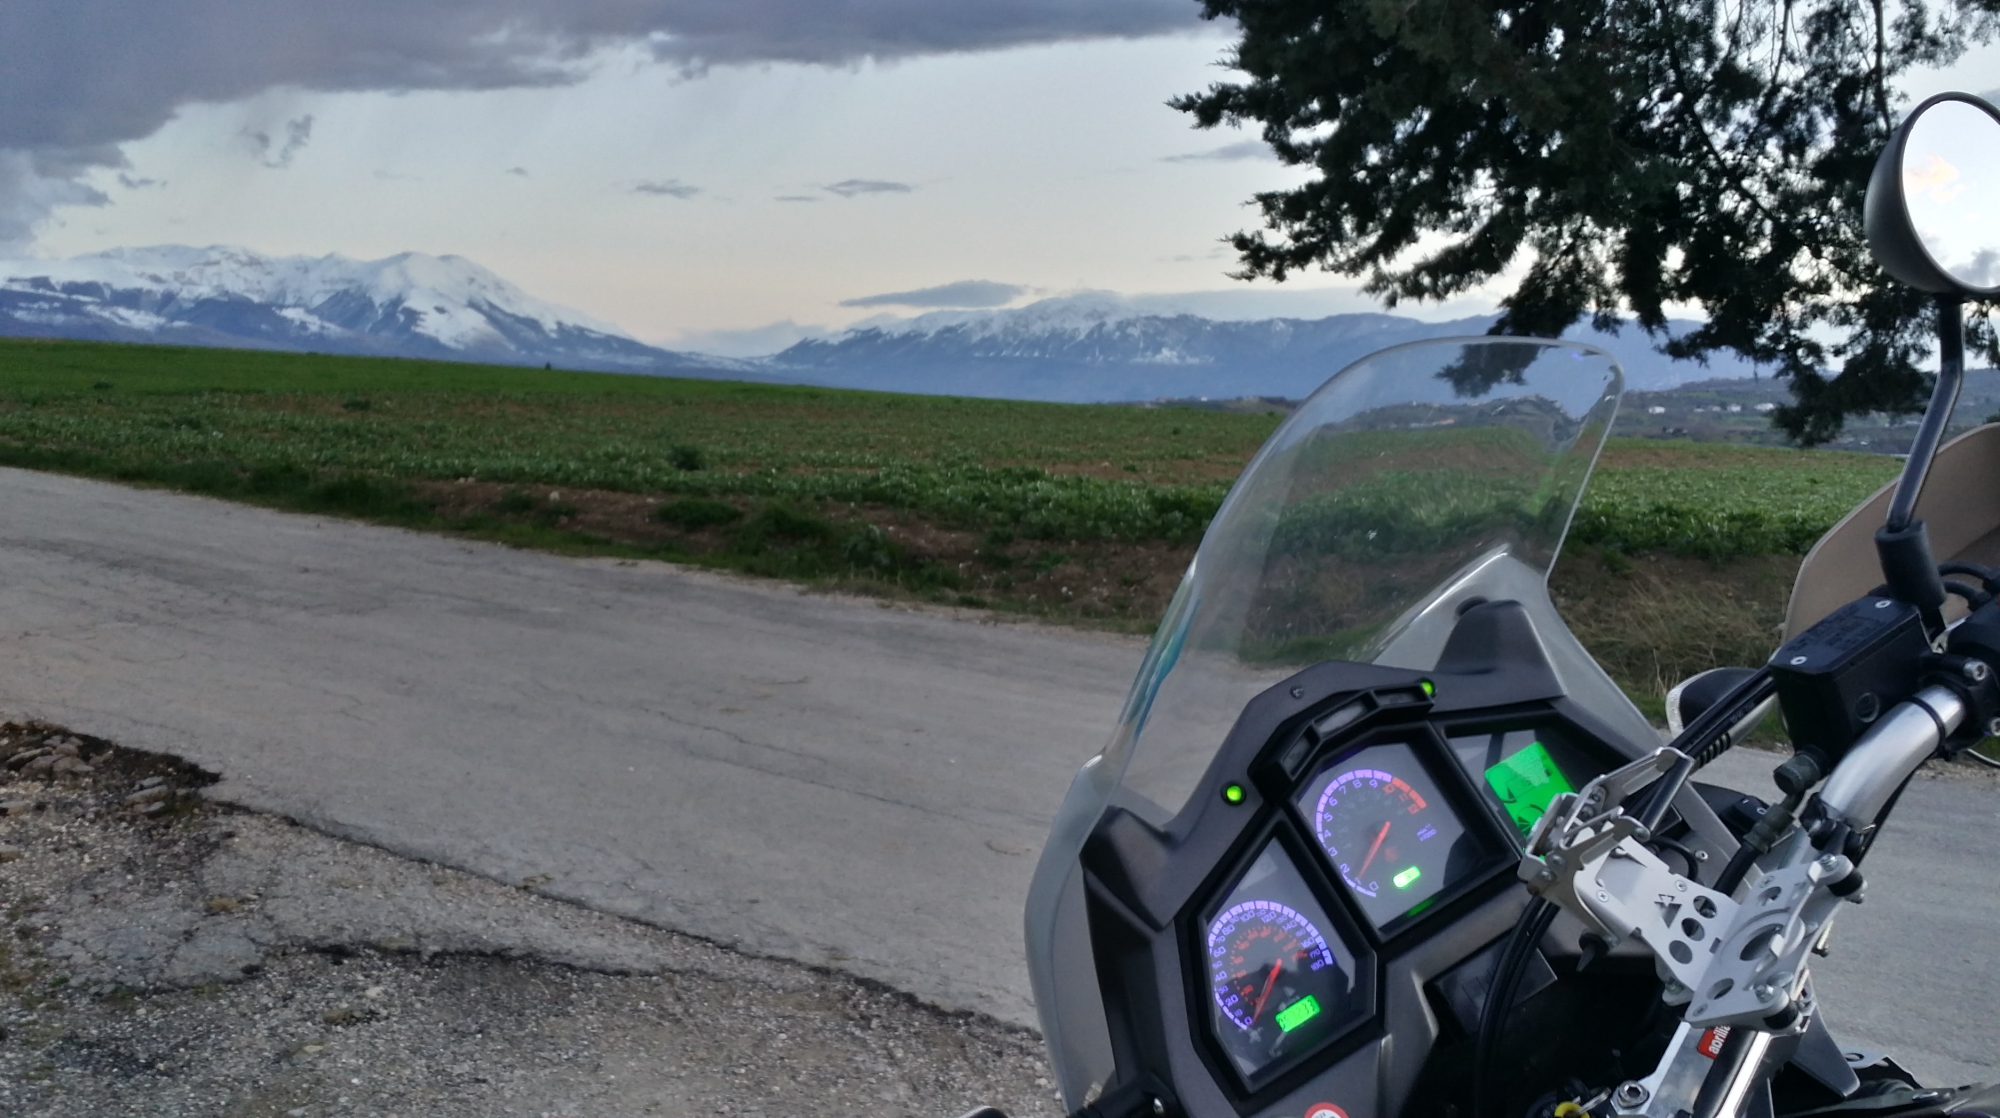
 Yes indeed it is all over. No, not the love affair with the venerable Caponord!! The three week holiday to Spain and Yorkshire (UK Caponord rally) is over and boy do I miss it already. Throughout, the Capo ran very well with only one odd fault for a couple of days that miraculously fixed itself – now that’s my kind of fault. It started just before I left … the RPM was slightly elevated at approx. 1,500 instead of the 1,250 set in the ECU. I hooked it up to TuneECU and hit TPS Reset and it dropped instantly – all good. Then a couple of days later, on the way to the ferry at Portsmouth, I noticed it was elevated again. Over the next couple of days it seemed to fluctuate between 1,250 and 1,500 for no obvious reason – raising or lowering at will. Then it just went away and has not come back since. All very strange. My guess is that it may have been a bit of stiction in the throttle plates that freed itself up with the daily use in Spain. But I guess I’ll never really know for sure.
After that it just did what it does best – keep piling on the miles – and let me enjoy the ride, scenery and company. Spain was hot (of course!) and Yorkshire wet ( double of course!!) so we both were put to the test for sure. In Spain I used the Knox Tor mesh jacket & Urbane Pro Mk2 mesh trousers over Rukka Outlast under-gear (all super cool) and Klim Badlands Aero Pro gloves all finished off by my trusty Daytona Travel Star GTX boots. For Yorkshire the suit was swapped out for the Rukka Kingsley two-piece suit and boy was I glad to have it’s excellent waterproof ability. So OK …. that’s the product placement out of the way, what about Capo updates/upgrades?


Well not much actually, but what there is has been unobtrusive and potentially useful. Firstly, the front axle spoke-carrier had a rebuild with new 3D printed parts in a stronger material that looks better. Secondly, the top-box got a new 3D printed warning triangle finished with reflective tape and in the middle a 3D mounting for a 50-second Firestick (fire extinguisher) ….. all recessed into the foam lining so it doesn’t affect luggage capacity, nor add noticeable weight to the lid – a win-win! This was all topped off by a set of luggage bags from xxxx made especially for the Raid aluminium luggage. 1x large bag for the left hand pannier (main “hotel” bag), 1x large bag for the top box (bulky items and tech gear) and two half-sized bags for the right hand pannier ( secondary “hotel” bag and tool/spares bag). These were worth their weight in gold on holiday and I’m so glad I had them made – perfect!
So now I’m back what’s next? Well the front INNOVV K3 camera has developed a fault and appears to be causing the unit to freeze or record damaged video. As part of the fault-finding process I swapped the front camera from the ZZR1200 to the Capo and the system worked fine. So now I’m lighter by £73 (after discount) for a replacement. I can’t grumble really, it’s been in use for four years. Next up will be a mix of end-of-year mileage building and general servicing before winter. I’d really hoped to get the Capo through 190K miles by winter with a view to pushing on toward 200K next spring …… the long term goal is to then retire it and make it an ornament in the living room …. minus the luggage of course. Now I’m living the bachelor life once again, my home has become a shrine to all things motorcycle, not quite engine-in-the-bath, but not far off!
Oh … and yes, the stable has increased by one more Caponord. I’ve taken on my friend Andy’s Mk1 (Bat-ear) Capo. It’s now sitting under cover having been robbed of a few parts (levers etc.) to take away on my trip. Now I’m back, everything can go back on and I’ll maybe use it as a winter-hack before using it as a donor bike in the spring for the other RallyRaid (NK03). Before winter hits there may even be one more Capo arriving – a rather special one – another Rally Raid! I’m currently in talks with the owner, let’s see what happens. Fingers crossed!
Next weeks super-exciting instalment … fixing the MCCruise cruise control.
Bella Italia ….. my old friend!

Well it has certainly been a while since I last posted on here, so maybe now is as good a time as any to pick up where I left off. As you can imagine, the last twelve months have seen many changes and a lot of things that needed to be ticked off the list of life …. the most recent being a run back home to Italy after almost four years. 2020’s Covid lockdown didn’t help of course and then after Jan passed away last year I just couldn’t face the trip alone. But eventually the clouds parted and the Caponord got to do what it does best, run faultlessly for almost 4,000 miles over a couple of weeks! This then is a potted summary of what stuff worked and what could be improved for next time.
The fact is, lots has changed since I last travelled over – all my riding gear is different for one. The Capo has had a fair amount of maintenance/refurb during those years and even my cookware of choice had changed! Gear wise, I’m now using Rukka/Daytona and of course the venerable Shoei Neotec 2 with Senna intercom. All performed faultlessly especially in some prolonged and very heavy rain in Northern Italy/Switzerland. Expensive gear yes, but worth every penny in my book. Oh and I can’t leave out the surprise of the trip … EDZ Merino wool socks! Those and the Daytona boots kept my feet comfy warm and dry like never before, absolutely fantastic.
Cookware wise, the old Trangia stayed in the loft and I used the much smaller and neater gas cooker that I got from Manuel over at motrag.com ….. as a one-person unit it worked fine for me. Hot coffee on the go in the smaller mug and and a re-heated pasta dish in the bigger one was just about perfect after a long run. Simple, compact and a doddle to use, it’ll stay the cooker of choice for now.


One concern on the trip was the Capo’s battery. Throughout, the voltmeter showed charging ranging from 13.9 – 14.2V depending on load, but less than an hour after shut-down the battery standing voltage would fall to 12.4 – 12.6V and that isn’t great. Ultimately it never actually gave me any trouble, but it was waving the imminent flag of failure, so time for replacement. As soon as I was back in Blighty, I ordered a NOCO NLP-14 LiFePO4 battery. I have exactly the same one on a ZZR1200 and Andy (BeastHonda) has one on his Caponord ….. short and simple, they work. For the ZZR, it was a straight swap, but for the Capo, the terminals have to be modified slightly – no biggie and I’ll post more on that later.

Other than the battery, the Capo performed brilliantly, returning an average of 46mpg using the heavily modified Catfish 50429 map/airbox/snorkel and even managed 52mpg through the Swiss alps. I can live with that! The Mitas 07+ tyres worked well and wore predictably, however they were a tad skittish on wet over-banding …. but maybe I’m being picky when the Capo is fully loaded, leaning and doing 80mph at the same time! Throughout the ride I used the cheaper E10 fuel as I wasn’t going to be keeping it in the tank for long, but as the mileage to Calais ticked away, I changed back to E5. Once off the boat at Dover I changed again to Shell Supreme 99+ …. ethanol free. Expensive yes, but so much more friendly to the Capo fuel system.
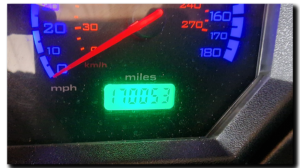
Finally I rolled into a dark and cold Oxford driveway at 1:30 in the morning with the Capo showing 170,053 miles in the dashboard. The arthritis in my knees is playing up and my backside has had enough of today …. but through all that I just feel so immensely proud of the Capo. So what next? A well earned clean and service in the short-term and then a full rebuild and line replacement for the rear brake, just to bring it back up to scratch and looking as fresh as the front brakes. I should also get around to replacing the fuel sender unit .. it stopped reading properly a year or two ago and I have all the parts to hand, but never found the time/enthusiasm. I think the Capo has earned it. After that? Maybe it’s time to head North for a change, who knows.
Tragic loss
 Today I mourn the passing of my soulmate, best friend and wife of almost 30 years – Janet. She fought so bravely for two years against cancer, but was finally taken from us yesterday after a sudden and unexpected downturn. Family were at her side at the end as she passed peacefully. Today the pillion seat is empty and the intercom silent …. for over thirty years we travelled together on two wheels. Goodnight my beloved sweetheart.
Time on my hands …..

It’s fair to say that these strange and worrying times will touch all of us in some way or other, so may I firstly send each and everyone of you all my best wishes as we each deal with the Covid-19 pandemic. That said, life still moves on and this site is about the beloved Caponord ETV1000 we are lucky enough to enjoy, so it’s content will stay focused to that end.
Recently the fantastic company I work for has taken the difficult decision to furlough us until the end of May, but the flip side of this particular coin is that I’ll now have a lot more time to add new material to the website and spend some well needed hours spinning spanners and generally giving the Capo the TLC it so richly deserves. So please, stay safe, and pop back once in a while and see what’s been added!

First on the list ……. the front mudguard. I’d only had the Capo a year or so, when one fateful day a rather inquisitive chicken decided the front mudguard was a smashing place to perch, but not very grippy. So after lots of slipping around and trying to dig its claws in, it gave up and flapped away in a huff leaving nice scratches in the surface of the mudguard. Since then, a coat of black bumper polish every now and then has gone some way to masking the marks, but it needs applying every few weeks to maintain the effect. Later that fateful day, the chicken mysteriously decided to perch inside a hot oven with some lovely roast spuds ….. and close the door. Who knows what goes through a chickens mind eh!
Last year … yes, last year (the shame of waiting so long!), I got hold of a rattle-can of ‘Plasti Dip’ satin black. This stuff is quite interesting, it sprays like a paint but can be peeled off later like a vinyl wrap. Just do a search, there are loads of YouTube videos about this stuff. So the plan is, off with the guard, a good wash and degrease then when thoroughly dry, a few coats of Plasti Dip – if I don’t like it, simply peel off re-polish and put it back on the bike – nothing lost. That’s the cunning plan anyway …


 Next on the list …. another little update to the 4D Systems screen software! An extra page has been added that now allows control of heated grips and seats. Here’s a little video of it in action … again, it’s a work in progress and will have a couple of graphic tweaks and an extra function added into the software, but for now it’s a working prototype with three PWM (Pulse Wave Modulation) outputs (one per heater set) that will drive a high power circuit controlling the heater elements. These circuits are capable of handling 12A each, so more than tough enough for grips/saddle heaters.
It uses the 5-button switch assembly so that the grips can be adjusted on the fly, rather than have to use the smartphone app like the other info pages. The basic functions are:
- Press and hold OK to access the screen or return to main screen
- Use the UP and DOWN buttons to select the heater you want to adjust
- Use the LEFT and RIGHT buttons to adjust the heat settings – a single press adds/removes 1 block (10%) while press and hold a button ramps up or down until released
- Double click the LEFT or RIGHT button to set all heaters to 0% or 100% instantly. When set to 100% there is a five minute timer, then the grips return to preset values – this is ideal as a pre-heater on wintry mornings!
- Finally, Double click the OK button to return all heaters to preset values
- In-built safety cuts all heaters when the ignition is turned off
Updates in the pipeline …… addition of a settings page in the smartphone app to allow some flexibility. For example – a timer when the ignition is turned off, so the grips can remain live for a few minutes (like the Oxford grips do) … and the ability to inhibit the pillion heater completely if you never carry a pillion or feel the need to heat luggage you have strapped on!
… and back again!
 As I rolled off the bottom of Stokenchurch hill with a clear motorway ahead and a remaining journey time of 15 minutes, it was time for a little post-ride reflection. The dashboard temp gauge dropped another degree and sat at 5C – hardly the 20C at midnight when I’d left Italy 19hrs previously! Never mind, the Oxford heated grips were doing their thing, keeping my podgy fingers nice and toasty in my BKS winter gloves. From the front of the bike, the white beams of the Sealight X2 LED’s turned night into day – from hard shoulder to armco barrier a reassuring spread of light paved the way.
With 550 miles of night-time riding under the belt in the last 24hrs, I can truly say these things are awesome and Euro motorway speeds (130Kmh /80Mph) are a doddle, even on tricky motorways with tunnels that sneak up on you and bends that you just don’t expect on a motorway – all in a day’s (or night’s!) work for these babies!
As I approached Oxford, I dipped the back brake to cut the cruise control …….. the cruise control …… I haven’t given it a moment’s thought for a long time. It just does what it’s supposed to, no drama, just smooth throttle control over long tedious distances, up hill and down. The sign then of a cracking piece of kit, when it fades to the back of the mind as it quietly gets on with the job. Without it I’d be stuffed, my wrist just cannot do these sort of mileages anymore …. so I doff my cap in appreciation for a fine piece of kit that keeps me crossing continents – cheers MCCruise!
So everything is happy bunnies in the house of Moto-A’s Capo? Not quite unfortunately …. the fuel sender has decided to sulk and the fuel gauge can no longer be relied upon to be anything more than decorative! My guess is the sender itself needs cleaning or replacing as everything else checks out OK. Not a big issue in the scheme of things and a way of remembering how we used to do things – fill-up,  reset the trip and ride up to a mileage above which you know you’ll be pushing – and repeat! Happy days ….
So now, 48Hrs on, a new fuel filter (Ducati 42540101), fuel pump (Bosch 0580453427), ‘Zero Leak – Low Profile Ear Clamps’ and Caswells epoxy fuel tank sealer have been ordered to complement the spares on the shelf – large gasket, short section hose (filter to plate), corrugated fuel line (filter to pump) and wiring harness. Hopefully this little lot will keep the fuel tank in tip-top condition for many years to come!
New year, new domain!
 https://www.moto-abruzzo.net/
Well it looks like 2018 is bringing in changes thick and fast … Not only are we relocating, but moto-abruzzo has also moved! The site has changed to a new domain (see above! 😀 ) but more importantly, it has had an upgrade in security – we’re now https instead of good old http. That simply means that any interaction you now have with the site is encrypted and secure, especially important with the expansion plans that I hope to roll out over the coming year. Meanwhile I’ve a lot of website-tweaking to do as some bits didn’t seem to survive the move too well ….. more midnight oil to burn!
Website upgrade
 Not much to post at the moment folks. The Capo has been sitting quietly in the barn for three weeks while my right wrist had a complete meltdown. I’ve only been able to push a mouse or hold a pen for a couple of days, let alone think about riding a bike!
However one thing I have managed to do this week is upgrade the server-side thingumajig from PHP5.3 to PHP7 …….. is that tumbleweed that just wandered by? Yes I know, dull as dishwater – but it’s what ultimately puts my pages on your screen. So as a huge favour could I ask you folks to drop me a line if anything on the site doesn’t work or looks wrong, it would help speed up confirmation that the site is still all intact and not wobbling around waiting to croak at any second.
Oh and one last bit of good news – I have joined the Beta testers for the TuneECU app, which is fantastic and I feel very privileged. Thank you Alain! I can’t wait to see what marvels we have in store ……
And now the dust settles …..
 With a hot brew to the left and a warm mouse to the right, I’m ready to reflect on the last ten days as the Capo sits outside soaking up the morning Abruzzo sun. After the hiccup at 138 miles the remainder of the 3,000 miles went perfectly, not one low-volt drama in sight. Mind you, that is with a new YTX14H-BS battery in the bike since last Thursday!
That same morning she’d sailed through her MOT with a clean sheet at 120,861 miles and now reads 122,135 miles at journeys end. Waiting in the panniers is a new Aprilia 150A starter solenoid (AP81129275) ordered online  from Aprilia performance (UK) and deliver in 48Hrs which is great service, also a beautifully made power/ground cable kit from John Walker who pulled out the stops to make sure the kit reached me before we departed for Europe. More on this later.
So on reflection, what next for the dear old Capo? Well I’ll install the solenoid and cables over the next week or so and dig out the rear wheel/sprocket carrier bearings and seals, since a dull drone can be heard from the back wheel at about 50-70mph – and is getting steadily louder. There’s  no play or sign of rust near the seal, but my guess is that one of the bearings is on the way out, so best do a touch of pre-emptive maintenance I think. 😀
Highs and lows of the trip …… low, the DVSA. I can’t and don’t want to say anything on that front …… the high, yesterday afternoon, slicing through the late afternoon A14 traffic side by side with a new gen Caponord also two-up. We kept each other company for 20 minutes or so until he peeled off for Rimini, big smiles and waves all round! Great fun!!
And so, waffle over, without further adoo let the spanner twiddling begin! 😯
MOTRAG cooking set and gas burner – 2.7Kw!!!
 kit and gas burner") Maybe I’m a tight git or just a fussy bugger, but when I’m on the road I like a mug of tea (or coffee) my way – not some overpriced bucket of gut-wash served up at Costa-Bucks on almost every street corner and in every motorway services. If it’s a short trip I’ll take a flask, if it’s a biggie I take a Trangia … or at least I did!
Maybe I’m a tight git or just a fussy bugger, but when I’m on the road I like a mug of tea (or coffee) my way – not some overpriced bucket of gut-wash served up at Costa-Bucks on almost every street corner and in every motorway services. If it’s a short trip I’ll take a flask, if it’s a biggie I take a Trangia … or at least I did!
I’ve been using a Trangia for donkeys years …. they’re reasonably compact, easy to set up and heat predictably although there is a definite knack to setting the flame adjuster if you don’t want cooked fingers as well. The wind shield does a good job and the whole thing is well planted and has a low center of gravity to keep it stable – in other words well designed.
So when Manuel at Motrag asked me to try out the cooking kit and gas burner he sells through his website I must admit to not being 100% enthusiastic. I like my Trangia. Anyway since last summer I’ve used his setup and have to admit (begrudgingly! 🙂 ) it does have some distinct advantages and to be fair the shortfallings are easy to work around.
 The burner is a work of art! Very small and very powerful. Back to back tests between the gas burner and the pre-heated Trangia had the 0.6L kettle boiling in 4 minutes and 8 minutes respectively, so it certainly has some punch to it and of course using a gas canister is far less messy than using Methylated spirit. The gas canister and burner pack away into the two halves of the pot kit (2x pots – 0.4L & 0.8L) and this in turn packs away into a neat bag. Overall the Motrag kit is 155mm high x 125mm diameter – approx. 1.9L volume and weighs in at approx. 540g INCLUDING a full gas canister. In contrast the Trangia 27 (2 x 1L pots, 0.6L kettle & frying pan) is 100mm high x 185mm diameter – approx. 2.7L volume and 880g in weight EXCLUDING fuel, certainly making the Motrag set more pannier/top-box friendly if space is a premium.
 What are the down-sides of the Motrag kit? well the gas canister is approx. 10cm diameter in comparison to the 18cm of the Trangia, also the height that the pan sits is 14.5cm in comparison to the Trangia’s 11.5 (lowest) making it more unstable and definitely needing firm level ground to work on. Add to this the fact that the Motrag burner is a small diameter with no support means that pans/kettle have to be placed very carefully or they fall/slide off the side – been there, done that! Finally the lack of a wind shield makes it awkward to use on a windy day – most days in Northern France it seems!
However there is a work around for both issues. Firstly it isn’t rocket science to design (and 3D print) a fold-way set of legs to hold the canister base and increase its stability, secondly a cunningly cut tin-can is used as a slide-down wind shield for the pots and seems to work just fine!
 So …. bottom line, will I keep using it?
Yes definitely. For solo trips it suits me down to the ground, it’s compact, clean and neat. The burner is just absolutely awsome – I swear you could spit-roast a whole hog with it! 😀
However when two-up I think the added flexibility of the Trangia just pips it and so it’ll still be my stove of choice for those trips. What I really don’t like about my old Trangia is the residue where the raw aluminium rubs together – however they do a nice hard anodised (27-6HA) version with none-stick pan – luxury! So that’ll be on the shopping list this year I recon! 😀
A huge thank you goes out to Manuel at Motrag for sending the kit for review – cheers fella!