 I joined the HD camera bandwagon back in January 2014 and since then have enjoyed (or not!) the delights and foibles of the GoPro Hero 3+ Black camera. Constantly charging a bucket load of batteries, taking it on and off the bike then getting frustrated when the current battery needs replacing/recharging in oh-so short a time.
In the end of course the penny dropped. The GoPro is simply overkill for day-to-day riding where (hopefully) nothing of any note happens. But if it did, I’d still like to capture it if possible, just in case it could help with an insurance claim or legal dispute.
I realised that what I wanted wasn’t an ‘Action camera’, but a ‘dashcam‘ …. a subtle difference it seems! So here’s what I’d like it to do:-
- Bike AND battery powered – turn on/off and record video with just the turn of the ignition key
- 2 cameras – forward and rear both recorded by a single unit
- Full HD – 1920 x 1080 (30fps minimum) progressive with good low-light capability
- Protect files – Either on demand or on collision detection
- Be designed for motorcycles – waterproof and ruggedised.
And so courtesy of Jim at Abbey Motorcycle Instructors in Oxfordshire, an INNOVV K1 dual-camera kit found its way to the Capo. While the INNOVV didn’t tick all of my ‘wish-list’ it ticked more than most. The full specification of the K1 can be viewed here.
I’ll skip ‘what’s in the box’ and unpacking waffle because all this is available on the INNOVV website, along with quick-install instructions and owners manual. What I ended up with is the motorcycle kit (including the 12v/5v voltage regulator*) and a 128Gb memory card. The owner’s manual specifies 64Gb max but INNOVV sell the 128Gb, so I can only assume the manual hasn’t been updated yet following firmware updates.
To fit the kit to the Capo required a bit of sacrifice. The long serving and ultra-reliable Autocom Pro-7 unit had to come off the bike and has now been streamlined and put into the tank bag along with the ICOM PMR446 radio. You really can’t keep a good, but very old bit of kit down for long!
Installation
 The INNOVV 12v/5v voltage regulator is wired into the tail-light loom and installed on top of the ECU with a (provided) double-sided sticky pad. I have to be honest here and admit that I already have an extra loom in place ready for the Active Brake Light System which is still being built. So in the meantime I pinched its Molex connector to power the K1. Next the GPS unit was installed in the Capo’s luggage bay just behind the ECU on a 3D printed bracket so it fits nicely next to the MCCruise electric servo.
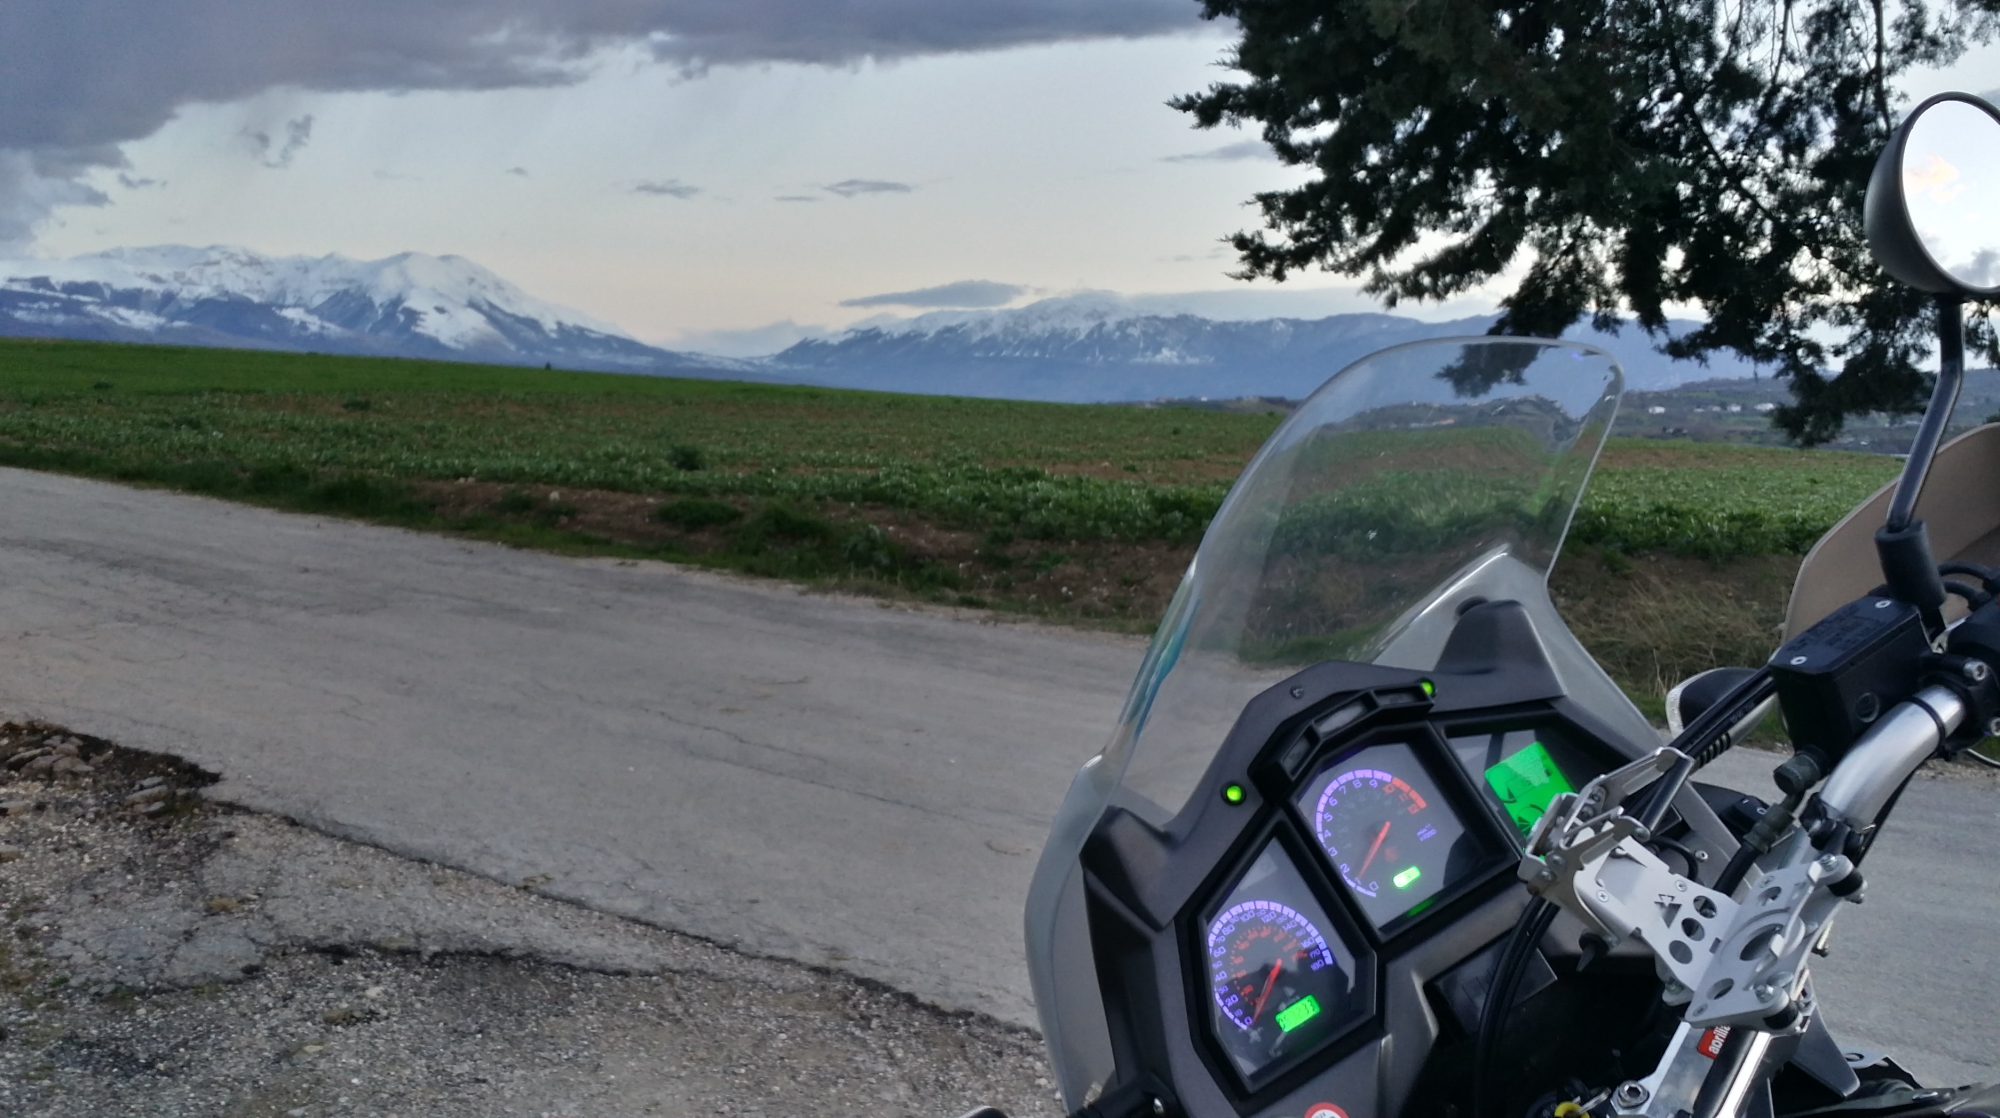
With that done it was time to install the cameras. I decided I wanted them on the center-line of the bike rather than bias them one side or the other. I wanted them EU/UK road friendly! The rear is mounted just above the tail-light and the front on the headlight guard. Both are angled down about 7º to reduce glare, each has an excellent view of the road with only the edge of the top-box getting in the rear camera frame. The cameras are each physically identical (just different cable length) and have machined aluminium bodies that are waterproof and heavy-duty, however the lens (especially front)  is vulnerable and would benefit from some protection. They each have three 1/4-20 UNC thread mounting points (normal camera thread) and come with basic steel L-brackets. However I decided to make my own to best suit the mounting points – the rear from a piece of steel plate, while the front is 3D printed and bolts to the headlight guard (AP8791235). The final two items in the box are the push-button and a small loom that plugs into the DV recoreder, joining both button and GPS USB’s to one connector, however I left this off for the initial trials – more about this later.
Setup
With the kit fitted it was time to set-up the unit in the two recorder menu’s. Time, date and vehicle name are straight forward as was selecting camera orientation – one of mine had to be rotated. Initially I set both cameras to 1920×1080, then had a play with 1280×720 on the rear, but ultimately went back to full HD on both. Again all the settings (bar one) are covered in  the manual. The one that is missing is ‘EDOG beep’ …….. INNOVV tell me this is to do with warning of being over-speed but requires the speed camera data to be installed. Besides, the ‘beep’ is under the saddle and inaudible for riders, so I leave it switched off.
The system also incorporates accelerometers in the front camera and they can be used to lock video files or start the cameras (Park Mode) when they detect an impact above a certain value. Setting this value is trial and error and at first I found it locked files when riding along our dirt/stone road. It’s something you can tweak over a few rides until it suits your roads/riding style I guess.
Operation and observations
With the Capo buttoned up, it was time to give it a whirl and see if it really is as fit-and-forget as I wanted. In short yes it is! We all have our little routines and mine is key-on, wait for the dashboard to finish its self-test, hit the starter and when the motor settles, turn on the lights. At that point the K1 turns on and immediately begins recording. I set mine for 10 minute segments, the selection is 1, 2, 5 and 10 minutes. At the end of the ride simply shut off the lights or ignition and the K1 reverts to its internal 3.7v 1100mAH battery** to finish the current file and store it, then it shuts down. It couldn’t be any more turn-key if it tried! The K1 also has voice (and beep/bong!) confirmations that tells you what it’s doing, but you look mighty odd jumping off your bike and sticking your ear to the pillion saddle, so I turned it off once confident it was working reliably.
 With a 128Gb card installed it records for about 14∼15 hours before overwriting the first files it recorded. All video files can be viewed directly on the recording unit, with basic fast forward/reverse functions or remove the SD card and pop it into your computer. When you format the memory card in the recorder it adds a useful viewing program (Registrator Viewer 5.8 for Windows) that allows you to not only view the files but it can also show you location/speed/heading from the GPS data and data from the accelerometers. However, if you want to save your video as picture-in-picture format like you see dotted around the internet, you’ll need a video editing package such as Adobe Premiere Elements.
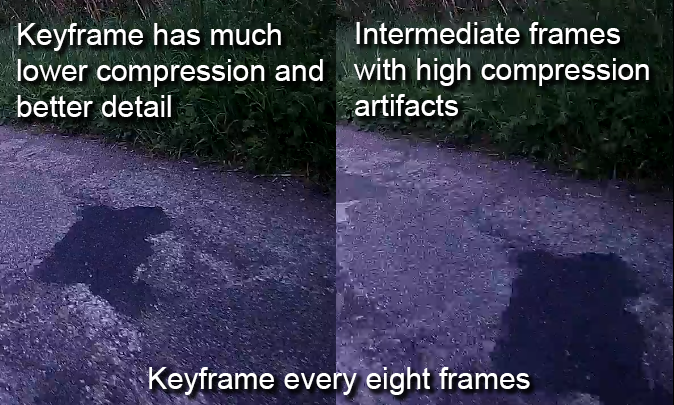
What about picture quality? I left the menu settings at default, however there are a few items specifically for tweaking the image quality – resolution, quality (Normal, Fine & Super Fine) as well as WRD (Wide Dynamic Range). This improves the cameras night-time images or images with strong back-lighting where objects appear more in silhouette. Personally I find the images pretty good but a little over sharpened such that there is some noticeable image ringing. Also the data rates differ front to rear, the front camera has a data rate of 12Mbs while the rear is reduced to 8Mbs and I found definite compression artifacts on the rear footage especially (for example) when riding along a tree-lined road where the image has lots of fast changing areas (overhanging trees) instead of a relatively constant sky. Maybe I’m being a little harsh here. After all it is a budget dual camera system not a high-end Sony/Nikon/Cannon! But having said that, and looking at the specification of the Ambarella OV2710 sensor and A7LA70 chipset I can’t help but think that image quality can be improved by tweaking the firmware. Maybe an update will be released in 2017?
Here’s a short video put together from K1 and GoPro (top left & audio) footage. The Capo popping on the overun has stopped since the new camchain tensioner was fitted and the slight front camera movement has gone since the new mount has been fitted ….. oh and some of the quality has been lost sending it over to YouTube. 🙁 I think I better do a new video!!
Parts not used
As mentioned previously, there is a push-button provided as well. This is used to lock/unlock (momentary push) the currently recording video file and (2-3 second push) to start or stop the recording. When recording an LED is lit in the button. Now here is  quite possibly my biggest gripe of the K1 system. The button isn’t waterproof and the LED is so weak as to be almost impossible to see except in a dimly lit room (or car interior?). I decided to strip it to find out what makes it tick, then set about replacing it with something more useful.
The button has two functions – first it grounds a 3.8v signal line (the button push), second the LED is fed by a 1.8v 11mA signal from the DV recorder – both ground through a third wire. So I knocked up an interface box to improve the LED power and feed both signals forward to the old Autocom PTT (Push to Talk) button I still had on the handlebars. Now I have a waterproof, heavy-duty push-button and a much brighter LED that I can see in daylight.
Conclusion after 6 months use
 Overall I’m pretty happy with the kit and enjoy letting it do its thing …. nowadays I don’t think about it and only check the cameras are clean before heading out. In fact I only checked the SD card yesterday after about a month – everything is recording just fine.
The one niggle I had early on was intermmittent locking-up or shut-down of the DV recorder. This was cured by fitting ferrite cores to all the leads. The only other change I’ve made has been the replacement of the bag provided for the DV recorder with a 3D printed frame – similar protection but with better ventilation for cooling – it does get VERY warm over time! Anyway, here are a few more bullet points that come to mind.
Good
- Build quality, installation instructions & general performance
- Price (pre BREXIT £/$ crash!) of approx £200
- Availability of accessories and spares
- Communication with INNOVV – quick response to emails.
Could be better
- Improve video quality – reduce compression and sharpening
- Waterproof heavy duty button with bright LED specifically for motorcycles
- Supply a pair of lens protectors in the kit
- Susceptible to RF interference – shielded wires or add ferrite cores to cameras/GPS/switch wiring
- Waterproof cases for the GPS and DVR unit.
Other things to possibly consider for the future ….
- Improved battery capacity and reduced drain when unit is switched off
- Wireless or Wi-Fi capability for intercom or Off-Bike video file storage on a smartphone. Maybe the system could notify you via SMS if the Park Mode is activated by impact?
- Combine the DVR and GPS units to reduce the overall number of cables and connections.
* The voltage regulator has been updated with a sensing wire to be attached to a switched 12v source while the red/black connect directly to battery supply. The regulator supplied in my kit did not have this upgraded function.
** This is the same battery as used in the old GoPro / GoPro2 – Battery model AHDBT-001 or 002. There are loads of aftermarket versions of these on the Ebay if you need to replace it.
What a great write-up. I’m also a K1 owner, like you I was having intermittent problems until I fitted the ferrite suppressors, been working a treat since. The remote button stopped working on mine a few weeks back, INNOVV are sending me a replacement but I much prefer the look of yours, are you willing to sharing the build instructions so I could do something similar? Thanks again.
Hi Steve,
Thanks for popping by! Yes it certainly looks like INNOVV need to address the RFI sensitivity issue and I’m sure they will. I’m in regular contact with Rock Liu at INNOVV and they really do like to get feedback on all the kit they make. A nice change from the attitude of many manufacturers! I’ll gladly share details of the button/LED interface …… it is a bit overkill to be honest but it works and I’m happy with the results. I’ll email you directly as it’s a bit long winded for a ‘comment’! 🙂
Karl;
Nice write up. I love the Innovv (when it works). Currently, I have issues with it shutting down while I’m riding and giving me a ‘recording stopped’ verbal message over and over until I pull the battery or push the reset button. Rock and I have been trying to run down the issue. I’m wondering if the ferrite suppressors would help? I’ve also had the front camera suddenly record with an all pink hue. I was unaware the remote button was not weather resistant. This may be an issue as well. I currently have mine mounted on the tank console where my headset used to plug in (H-D FLHTK). I agree the LED indicator is all but worthless in the daylight. I will try unplugging it and see if it helps resolve the issue I’m having. I’m curious what setting you placed the g-force setting at? Currently have mine off, but would like to have it active should I need protected files. With the 126gb card, I don’t think this would be a major issue and the unit would probably not have time to overwrite a file should I activate the g-force limits needed.
Hi Carl, I to would like the build instructions for the button you designed if possible. Thanks for the great write up.
Hi Don,
Thanks for dropping by ….. I’ll put up a new post shortly about the button/LED as several folks have asked about it. My pleasure! 🙂
Cheers
KarlB
Hi Rick,
Great to hear from you! The symptoms you describe are EXACTLY the sort of thing I experienced – and yes, fitting the ferrite chokes cured the problems once and for all. I’m glad I’m not alone when it comes to the LED in the button! 🙂 As for the G-force, I have mine turned off now as even the most insensitive setting would trigger when the the Caponord goes off road – not really an issue though for a HD-FLHTK ….. or is it!!! Kudos if you do. 🙂
Cheers
KarlB
What are these Ferrite chokes that are being talked about and what are they for, did I miss something? If I need them where can I get them?
Excellent review can you also add me to that button upgrade email. Also if you got PayPal I’ll happily buy one of those 3D printed cases as mine gets hot being just above the exhaust system on my VFR.
Hi Alex,
Very nice bike the VFR, always loved them ….. as for the case, email coming your way! 🙂
Regards
KarlB
Hey @Alex Lewis, here are the Ferrites I bought from eBay.
http://www.ebay.co.uk/itm/Ferrite-Ring-TDK-ZCAT2035-0930-Clip-On-Up-To-9mm-Cable-4-Pieces-OM990-/250724456936?hash=item3a605799e8:m:mb4CfhgMO1C484R4CVPqFDw
And here’s a link showing how to fit them.
http://www.innovv.com/single-post/2017/03/16/EMI-from-Motorcycle-and-Solution
That’s one way to do it ……. if space isn’t an issue. Take a look at the next post to see the clip-on ferrites I used, they do the job and don’t take up much room at all.
Great article, thanks for posting. I’ve recently installed the K1 on my 2013 Goldwing, and as I am not adverse to riding in the rain, I would appreciate the directions for that waterproof remote button as well. Thanks in advance.