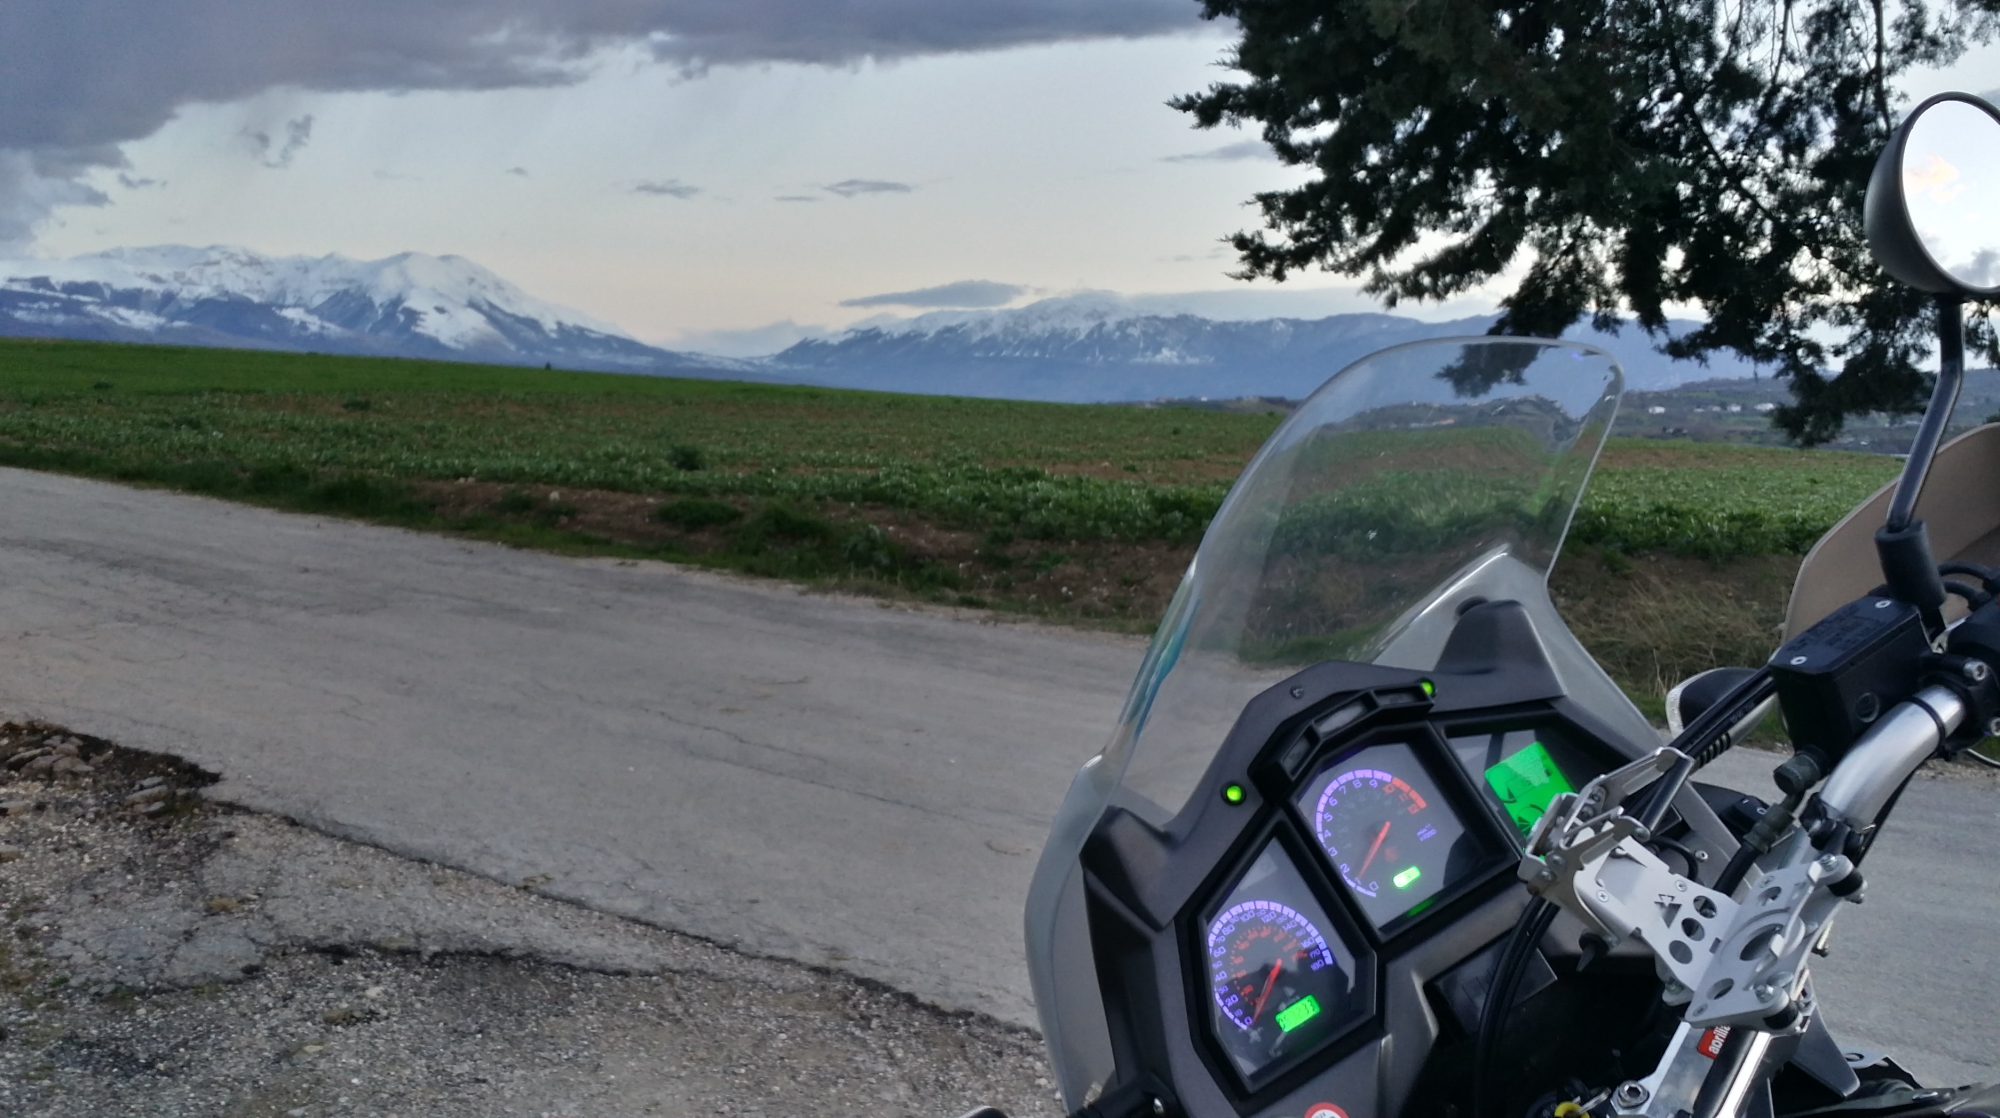
Yes indeed it is all over. No, not the love affair with the venerable Caponord!! The three week holiday to Spain and Yorkshire (UK Caponord rally) is over and boy do I miss it already. Throughout, the Capo ran very well with only one odd fault for a couple of days that miraculously fixed itself – now that’s my kind of fault. It started just before I left … the RPM was slightly elevated at approx. 1,500 instead of the 1,250 set in the ECU. I hooked it up to TuneECU and hit TPS Reset and it dropped instantly – all good. Then a couple of days later, on the way to the ferry at Portsmouth, I noticed it was elevated again. Over the next couple of days it seemed to fluctuate between 1,250 and 1,500 for no obvious reason – raising or lowering at will. Then it just went away and has not come back since. All very strange. My guess is that it may have been a bit of stiction in the throttle plates that freed itself up with the daily use in Spain. But I guess I’ll never really know for sure.
After that it just did what it does best – keep piling on the miles – and let me enjoy the ride, scenery and company. Spain was hot (of course!) and Yorkshire wet ( double of course!!) so we both were put to the test for sure. In Spain I used the Knox Tor mesh jacket & Urbane Pro Mk2 mesh trousers over Rukka Outlast under-gear (all super cool) and Klim Badlands Aero Pro gloves all finished off by my trusty Daytona Travel Star GTX boots. For Yorkshire the suit was swapped out for the Rukka Kingsley two-piece suit and boy was I glad to have it’s excellent waterproof ability. So OK …. that’s the product placement out of the way, what about Capo updates/upgrades?
Well not much actually, but what there is has been unobtrusive and potentially useful. Firstly, the front axle spoke-carrier had a rebuild with new 3D printed parts in a stronger material that looks better. Secondly, the top-box got a new 3D printed warning triangle finished with reflective tape and in the middle a 3D mounting for a 50-second Firestick (fire extinguisher) ….. all recessed into the foam lining so it doesn’t affect luggage capacity, nor add noticeable weight to the lid – a win-win! This was all topped off by a set of luggage bags from xxxx made especially for the Raid aluminium luggage. 1x large bag for the left hand pannier (main “hotel” bag), 1x large bag for the top box (bulky items and tech gear) and two half-sized bags for the right hand pannier ( secondary “hotel” bag and tool/spares bag). These were worth their weight in gold on holiday and I’m so glad I had them made – perfect!
So now I’m back what’s next? Well the front INNOVV K3 camera has developed a fault and appears to be causing the unit to freeze or record damaged video. As part of the fault-finding process I swapped the front camera from the ZZR1200 to the Capo and the system worked fine. So now I’m lighter by £73 (after discount) for a replacement. I can’t grumble really, it’s been in use for four years. Next up will be a mix of end-of-year mileage building and general servicing before winter. I’d really hoped to get the Capo through 190K miles by winter with a view to pushing on toward 200K next spring …… the long term goal is to then retire it and make it an ornament in the living room …. minus the luggage of course. Now I’m living the bachelor life once again, my home has become a shrine to all things motorcycle, not quite engine-in-the-bath, but not far off!
Oh … and yes, the stable has increased by one more Caponord. I’ve taken on my friend Andy’s Mk1 (Bat-ear) Capo. It’s now sitting under cover having been robbed of a few parts (levers etc.) to take away on my trip. Now I’m back, everything can go back on and I’ll maybe use it as a winter-hack before using it as a donor bike in the spring for the other RallyRaid (NK03). Before winter hits there may even be one more Capo arriving – a rather special one – another Rally Raid! I’m currently in talks with the owner, let’s see what happens. Fingers crossed!
Next weeks super-exciting instalment … fixing the MCCruise cruise control.
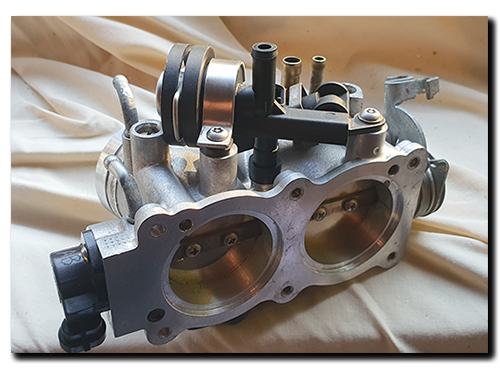
Sometime way-back-when, I bought a used set of throttle bodies off an RTS Futura (51mm v Caponord 47mm) with the view of doing some tuning/comparison work on the Raid with the 3D printed hybrid velocity stacks (51mm diameter but Caponord height). What really happened though was far less glamourous and only involved a sturdy box and a shelf! But about a month ago I dug them out again and realised that I pretty much had all the ingredients required to do a full clean and rebuild. I had stainless steel 4x10mm and 5x12mm Torx screws on the shelf as well as all necessary seals. The ultrasonic cleaning bath would do the brunt of the work and I could send the injectors away for professional cleaning at a reasonable cost.
And so, with a plan to hand, apart it came. First the injectors were sent away for cleaning. The turn-around was quick and the total cost was about £30 including P&P. Thankfully both injectors got a clean bill of health. Next, the throttle body and associated parts went into the ultrasonic cleaning bath. I had bought the 6L version …. but when you take into account the smaller basket inside, the usable capacity is probably something more like 4 – 5L … just enough luckily, for the throttle bodies. If I was in the market for another one, I’d definitely opt for the 10L or maybe even try to stretch to the 15L for good measure.
It was amazing the amount of debris that came out of them … in the end they looked almost brand new again! The rebuild was very straight forward with all new ‘O’-rings and screws used. Pleased? Yes I think so. They are refurbished and ready for action which is the important thing. The only downside is that some of the mild-steel components are still showing a patina of rust. It would have been nice to re-plate them to give them that as-new look as well. For now I’ve cleaned off what I can and coated the parts for protection, but one day I’d like to have a crack at home plating … zinc, nickel or passivate of some sort might be interesting.
Parts used:
2x 4x10mm Stainless Steel Torx screws
4x 5x12mm Stainless Steel Torx screws
4x 10mm OD 2mm section Viton O-rings
2x 14.1mm OD 2.4mm section Viton O-rings
2x BS203 O-rings
1x BS008 O-ring
Just throwing it out there ……. If I were to offer these out as a bagged kit, would anyone be interested?
As Guinness said, “Good things come to those who wait” …… and boy have I waited! When the new grips went on in late November, they were accompanied by the 3D printed temporary bar-end mounts. The clock was ticking, I had to get the grown-up adult versions (stainless steel!) made up asap as I’d no idea how long these things would hold up. In early January someone stepped in to do the deed.
Unfortunately, they never appeared no matter how much cajoling and nudging I tried. Finally, after 4 months I was out of time and the Capo had to return from Italy sporting the plastic 3D printed ones. I shouldn’t have worried though, they held up just fine!
So just when I was giving up on ever seeing a set, a mate offered to help, and in the blink of an eye made these beauties! They fit perfectly and the finish is brilliant – what more can I ask for? So a huge ‘Thank you’ goes out to Jason – stand up, take a bow, don’t be shy fella! The eagle-eyed will notice a change from the rendering (and drawing) in that the flats (for socket or spanner) were left off. This was to reduce machining time and also because they only really need to pinch up – I’m not torquing the nuts off an axle here!
Of course, once these were in the pipeline, I told the other guy ……… who then got all stroppy saying the material had been ordered …… this is after 5 months of waiting! Sheesh some folks. 🙄
Yesterday I was asked about the 3D printed speedo sensor case and I couldn’t believe that it’s been almost six months since last mentioning it and about nine months since fitting it. So how is it holding up? Well just fine and dandy thanks for asking!
So far, It’s been through a long 40C summer and some damn cold nights of recent. Heavy rain and a decent shake down over something like 12,000 miles including some off-road, add up to a pretty good trial all-in-all. The plastic is holding up nicely with no signs of cracks, warping or sun-fade, so it looks like the Color-Fabb nGen material is a good choice for use on the Capo and that is backed up by the frame bungs I made last year – all as good as the day they were fitted.
I’ve put a pdf drawing of the main body in the CAD/3D downloads area so you’ve some idea of the dimensions of the speedo sensor. Fitting a sensor from an alternative Aprilia is of course an option, the only real issue being the tight bend in the cable to make it fit, not particularly nice, but functional I guess. Also, is the cable long enough and does it have the right connector? I’ve no idea. Some may want to go with a different sensor altogether, fine in principle as long as it uses the same voltage/current range and the signal is compatible with the dashboard. then of course you have to make it fit, hopefully the drawing will help a little here as it gives depth, diameter and mounting hole location for comparison. Again there is the issue of cable length and connector …….
Just a word of caution though, the standard sensor is a snug fit in the caliper mount and cannot in any way move into the wheel. Can the same be said of an aftermarket sensor and its modified fitment? The consequences of something possibly working loose and jamming the back wheel don’t bear thinking about!
Of course I went for a third option, 3D printing. I’d originally thought of the case as reusable, but in the end, given the few pennies it costs to print I made it a semi-sealed item. The sensor is installed with sealant and after soldering the wires in place, the cap is also back filled with sealant and screwed into place. If and when it fails, I’ll just remove reusable bits (boot, screws etc) and print/assemble another one. Total cost (sensor, case, screws, wire, boot & connector) came in under £30 – Granted about the same as some RSV/SL sensors on ebay …. but that’s new not second-hand!
Now that I’ve finished running the C5 camera on the rear, I figured it was finally time to get around to making a more permanent mount for the rear K1 camera, rather than the piece of scrap steel strip that has done the job so far. Although it felt quite rigid, the fact is the video image would suffer with a bit of ‘jello’ above 6,000rpm – an annoying vibration in the image that makes it look slightly wobbly!
So after a couple of test runs to make sure dimensions were ‘ish’, it was a 6 hour slog-athon until the Robox printer produced this little puppy. It uses the same two M5 bolts as the steel strip, along with two more M4 mounting points to add a little extra rigidity. The camera now mounts (like the front) using all three 1/4-20 UNC points. I’m happy to say the image is lovely and stable, no more wibbly-wobbly video when the throttle gets lovingly caressed!
With all the other stuff going on recently, I almost forgot to mention that the run across the continent was a great make-or-break test for the 3D printed speedo sensor case! Works a treat and even if I say so myself, it looks way better than the original! 😀
Although it’s working brilliantly, I’ll modify the design of the cap to give a little extra room inside for wiring up …… and rotate the lion’s head so it’s horizontal, ya can’t beat a bit of OCD!
I honestly couldn’t believe my luck ….. dozens of perfectly normal starts after the one stuck-solenoid moment during our 10 days away and then, this morning in the comfort of the old barn, first start of the day it stuck again!
So it was off with the seats, top deck and right hand plastics, disconnect the battery Earth (Ground) then snip a few tie-wraps, unclip the two-pin connector and twiddle the 10mm spanner to undo the battery/starter cables from the old solenoid and voila! One dodgy 50A and 14 year old solenoid confined to the bin …… by way of stripping, measuring and knocking up in CAD!
It’s pretty obvious from the picture that one side of the contacts has been burnt and welded together such that the return spring couldn’t provide enough force to pry it apart again – that was the job of a swift whack from the all-powerful 1/2″ ratchet!
The new solenoid (AP81129275) was bench tested and shows a coil resistance of 4.4Ω pulling 2.9A at 12.8V – approximately! Now 2.9A is quite a current draw in itself, especially when you take into account the amount of wiring (under specified?) and switches/diodes along the way. The only way the solenoid really has of reducing pitting/burning is by opening and closing as fast as possible – opening is purely by return spring but the closing speed is proportional to the applied Volts/Amps ……. and if this is low then the solenoid will become sluggish and more susceptible to damage. So tomorrows little job will be to look at losses through the entire circuit up to the solenoid. In fact looking at the circuit diagram and simulating it in ‘EveryCircuit’ (Android app) it seems that the best possible current flow path you can give the solenoid is – bike in neutral, side-stand up AND pull in the clutch before hitting the starter … this adds a mighty 0.1V over ‘neutral only’. In comparison bypassing the diode block completely could elicit another 0.55V at a struggle!
I joined the HD camera bandwagon back in January 2014 and since then have enjoyed (or not!) the delights and foibles of the GoPro Hero 3+ Black camera. Constantly charging a bucket load of batteries, taking it on and off the bike then getting frustrated when the current battery needs replacing/recharging in oh-so short a time.
In the end of course the penny dropped. The GoPro is simply overkill for day-to-day riding where (hopefully) nothing of any note happens. But if it did, I’d still like to capture it if possible, just in case it could help with an insurance claim or legal dispute.
I realised that what I wanted wasn’t an ‘Action camera’, but a ‘dashcam‘ …. a subtle difference it seems! So here’s what I’d like it to do:-
Bike AND battery powered – turn on/off and record video with just the turn of the ignition key
2 cameras – forward and rear both recorded by a single unit
Full HD – 1920 x 1080 (30fps minimum) progressive with good low-light capability
Protect files – Either on demand or on collision detection
Be designed for motorcycles – waterproof and ruggedised.
And so courtesy of Jim at Abbey Motorcycle Instructors in Oxfordshire, an INNOVV K1 dual-camera kit found its way to the Capo. While the INNOVV didn’t tick all of my ‘wish-list’ it ticked more than most. The full specification of the K1 can be viewed here.
I’ll skip ‘what’s in the box’ and unpacking waffle because all this is available on the INNOVV website, along with quick-install instructions and owners manual. What I ended up with is the motorcycle kit (including the 12v/5v voltage regulator*) and a 128Gb memory card. The owner’s manual specifies 64Gb max but INNOVV sell the 128Gb, so I can only assume the manual hasn’t been updated yet following firmware updates.
To fit the kit to the Capo required a bit of sacrifice. The long serving and ultra-reliable Autocom Pro-7 unit had to come off the bike and has now been streamlined and put into the tank bag along with the ICOM PMR446 radio. You really can’t keep a good, but very old bit of kit down for long!
Installation
The INNOVV 12v/5v voltage regulator is wired into the tail-light loom and installed on top of the ECU with a (provided) double-sided sticky pad. I have to be honest here and admit that I already have an extra loom in place ready for the Active Brake Light System which is still being built. So in the meantime I pinched its Molex connector to power the K1. Next the GPS unit was installed in the Capo’s luggage bay just behind the ECU on a 3D printed bracket so it fits nicely next to the MCCruise electric servo.
With that done it was time to install the cameras. I decided I wanted them on the center-line of the bike rather than bias them one side or the other. I wanted them EU/UK road friendly! The rear is mounted just above the tail-light and the front on the headlight guard. Both are angled down about 7º to reduce glare, each has an excellent view of the road with only the edge of the top-box getting in the rear camera frame. The cameras are each physically identical (just different cable length) and have machined aluminium bodies that are waterproof and heavy-duty, however the lens (especially front) is vulnerable and would benefit from some protection. They each have three 1/4-20 UNC thread mounting points (normal camera thread) and come with basic steel L-brackets. However I decided to make my own to best suit the mounting points – the rear from a piece of steel plate, while the front is 3D printed and bolts to the headlight guard (AP8791235). The final two items in the box are the push-button and a small loom that plugs into the DV recoreder, joining both button and GPS USB’s to one connector, however I left this off for the initial trials – more about this later.
Setup
With the kit fitted it was time to set-up the unit in the two recorder menu’s. Time, date and vehicle name are straight forward as was selecting camera orientation – one of mine had to be rotated. Initially I set both cameras to 1920×1080, then had a play with 1280×720 on the rear, but ultimately went back to full HD on both. Again all the settings (bar one) are covered in the manual. The one that is missing is ‘EDOG beep’ …….. INNOVV tell me this is to do with warning of being over-speed but requires the speed camera data to be installed. Besides, the ‘beep’ is under the saddle and inaudible for riders, so I leave it switched off.
The system also incorporates accelerometers in the front camera and they can be used to lock video files or start the cameras (Park Mode) when they detect an impact above a certain value. Setting this value is trial and error and at first I found it locked files when riding along our dirt/stone road. It’s something you can tweak over a few rides until it suits your roads/riding style I guess.
Operation and observations
With the Capo buttoned up, it was time to give it a whirl and see if it really is as fit-and-forget as I wanted. In short yes it is! We all have our little routines and mine is key-on, wait for the dashboard to finish its self-test, hit the starter and when the motor settles, turn on the lights. At that point the K1 turns on and immediately begins recording. I set mine for 10 minute segments, the selection is 1, 2, 5 and 10 minutes. At the end of the ride simply shut off the lights or ignition and the K1 reverts to its internal 3.7v 1100mAH battery** to finish the current file and store it, then it shuts down. It couldn’t be any more turn-key if it tried! The K1 also has voice (and beep/bong!) confirmations that tells you what it’s doing, but you look mighty odd jumping off your bike and sticking your ear to the pillion saddle, so I turned it off once confident it was working reliably.
With a 128Gb card installed it records for about 14∼15 hours before overwriting the first files it recorded. All video files can be viewed directly on the recording unit, with basic fast forward/reverse functions or remove the SD card and pop it into your computer. When you format the memory card in the recorder it adds a useful viewing program (Registrator Viewer 5.8 for Windows) that allows you to not only view the files but it can also show you location/speed/heading from the GPS data and data from the accelerometers. However, if you want to save your video as picture-in-picture format like you see dotted around the internet, you’ll need a video editing package such as Adobe Premiere Elements.
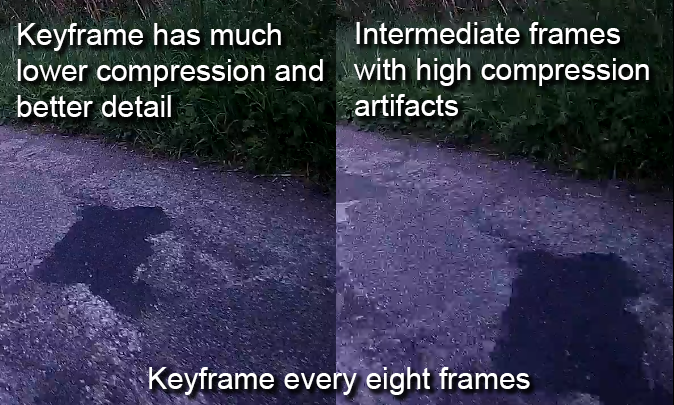
What about picture quality? I left the menu settings at default, however there are a few items specifically for tweaking the image quality – resolution, quality (Normal, Fine & Super Fine) as well as WRD (Wide Dynamic Range). This improves the cameras night-time images or images with strong back-lighting where objects appear more in silhouette. Personally I find the images pretty good but a little over sharpened such that there is some noticeable image ringing. Also the data rates differ front to rear, the front camera has a data rate of 12Mbs while the rear is reduced to 8Mbs and I found definite compression artifacts on the rear footage especially (for example) when riding along a tree-lined road where the image has lots of fast changing areas (overhanging trees) instead of a relatively constant sky. Maybe I’m being a little harsh here. After all it is a budget dual camera system not a high-end Sony/Nikon/Cannon! But having said that, and looking at the specification of the Ambarella OV2710 sensor and A7LA70 chipset I can’t help but think that image quality can be improved by tweaking the firmware. Maybe an update will be released in 2017?
Here’s a short video put together from K1 and GoPro (top left & audio) footage. The Capo popping on the overun has stopped since the new camchain tensioner was fitted and the slight front camera movement has gone since the new mount has been fitted ….. oh and some of the quality has been lost sending it over to YouTube. 🙁 I think I better do a new video!!
Parts not used
As mentioned previously, there is a push-button provided as well. This is used to lock/unlock (momentary push) the currently recording video file and (2-3 second push) to start or stop the recording. When recording an LED is lit in the button. Now here is quite possibly my biggest gripe of the K1 system. The button isn’t waterproof and the LED is so weak as to be almost impossible to see except in a dimly lit room (or car interior?). I decided to strip it to find out what makes it tick, then set about replacing it with something more useful.
The button has two functions – first it grounds a 3.8v signal line (the button push), second the LED is fed by a 1.8v 11mA signal from the DV recorder – both ground through a third wire. So I knocked up an interface box to improve the LED power and feed both signals forward to the old Autocom PTT (Push to Talk) button I still had on the handlebars. Now I have a waterproof, heavy-duty push-button and a much brighter LED that I can see in daylight.
Conclusion after 6 months use
Overall I’m pretty happy with the kit and enjoy letting it do its thing …. nowadays I don’t think about it and only check the cameras are clean before heading out. In fact I only checked the SD card yesterday after about a month – everything is recording just fine.
The one niggle I had early on was intermmittent locking-up or shut-down of the DV recorder. This was cured by fitting ferrite cores to all the leads. The only other change I’ve made has been the replacement of the bag provided for the DV recorder with a 3D printed frame – similar protection but with better ventilation for cooling – it does get VERY warm over time! Anyway, here are a few more bullet points that come to mind.
Good
Build quality, installation instructions & general performance
Price (pre BREXIT £/$ crash!) of approx £200
Availability of accessories and spares
Communication with INNOVV – quick response to emails.
Could be better
Improve video quality – reduce compression and sharpening
Waterproof heavy duty button with bright LED specifically for motorcycles
Supply a pair of lens protectors in the kit
Susceptible to RF interference – shielded wires or add ferrite cores to cameras/GPS/switch wiring
Waterproof cases for the GPS and DVR unit.
Other things to possibly consider for the future ….
Improved battery capacity and reduced drain when unit is switched off
Wireless or Wi-Fi capability for intercom or Off-Bike video file storage on a smartphone. Maybe the system could notify you via SMS if the Park Mode is activated by impact?
Combine the DVR and GPS units to reduce the overall number of cables and connections.
* The voltage regulator has been updated with a sensing wire to be attached to a switched 12v source while the red/black connect directly to battery supply. The regulator supplied in my kit did not have this upgraded function.
** This is the same battery as used in the old GoPro / GoPro2 – Battery model AHDBT-001 or 002. There are loads of aftermarket versions of these on the Ebay if you need to replace it.
After January’s awful weather – snow, rain, sub-zero temps, earthquakes & landslides, it’s been a very nice balmy February! So much so, that the Capo has squirreled a good few miles under its belt – the last 300 of them with the new snorkel in place. And I have to say, I’m really chuffed at how it performs. No extra induction noise that my aged arthritic lug holes can detect and no detriment to performance even though it’s been nowhere near a dyno to tweak the mapping.
As I write, a swanky set of Futura throttle bodies are winging their way here, as are a nice new pair of Mk2 cam chain tensioners – AP0236253. The velocity stacks are now finished and ready to fit to the throttle bodies and so it just leaves the matter of swapping out the Anakee Wild tyres for a fresh set of Anakee 3’s and a DID ZVM-X chain and Ognibene front/rear sprocket set (courtesy of Motrag) and I think she’ll be ready for a damn good thrashing on Dr Dyno! 🙂
With plans a-foot to assemble a big-cc motor for the Capo, it was time to cast an inquisitive eye over the airbox snorkel, that ugly rubber protrusion at the front of the airbox, sucking in hot air from on top of the radiator. This one object has been debated far and wide over the years – keep it, or remove it? Yes the questionable snorkelectomy!
Only a couple of ways to find out I guess. Dyno the bike with and without it or draw it up and run a flow analysis on it from the comfort of an armchair. Armchair it is then! With the model complete, here’s a couple of basic facts: Snorkel Inlet area (total) 1,750mm² and outlet area (total) 3,050mm². So the inlet is slightly restricted, the offending area is highlighted in the picture (click to enlarge). In fact, if the restriction were removed, the snorkel would have an inlet nearer to 2,400mm² – about 37% more!
To keep it simple the analysis was run with air at 1013mb and 20C, both with AND without the restriction in place and at RPM’s ranging from 1,300 to 10,250 – well above Caponord max RPM of 8,750.
I think it’s reasonable to say that the OEM snorkel doesn’t really do badly until it hits 9,000RPM+ and lets face it, by then the whole thing is over for the poor old Capo anyway! Based on a days digital twiddling and some airbox datalogging several years ago, I have to say that I’m planting my flag firmly in the ‘leave it alone’ camp when it comes to the OEM Capo snorkel. It isn’t and never will be an RSV so why try to make it like one ….. the standard bits are designed to work well enough together for the style of bike it is. Yes of course remapping will improve things no end, but why screw up the ride by making it noisier and offering the local mice a HUGE entrance through which to set up an epic knocking shop on the air filter!
But what about the big-cc conversion? well running the analysis with the 1,103cc and 1,127cc flow certainly seemed to cast doubt on the suitability of the OEM snorkel as the strong pressure drop is now occurring lower down the rev range. So the snorkel design originally drawn up back in October 2012 was dug out of hibernation, modified and polished up for 3D printing and run through the flow software – the green line on the graph above. Overall it seems to offer a cleaner flow, less pressure drop and maintains a similar airflow velocity into the airbox. Unfortunately the one thing the software can’t tell me is how much extra noise will be generated! The OEM snorkel is made of PVCD (flexible) AND has a foam pad in the roof of each inlet – both presumably are to reduce inlet noise.
With everything looking OK a few test parts were printed to make sure it’s going to fit, then the model was split into two along the mounting plate and both parts printed separately. This was due both to size limitations in the printer and because I didn’t want to use any support material to upset the surface finish. Afterwards both parts were bonded together and the inlet tracts rubbed down with 80/180/400/1200 grit sandpaper to get a reasonable finish.
With a bead of sealant and 4x M4x12 and 4x M5x12 screws and nyloc-nuts, the snorkel fits into place just fine. Of course only time will tell how well it stands up to the rigours of its new home! The OEM snorkel has a rubber/foam acoustic panel (AP8117151) that fits over it and of course it won’t fit the new one, so I’ve trimmed this one to suit(ish) and placed an order for a similar dual-material sound deadening product to make a new one specifically for this snorkel. However the chopped-about old panel can’t be far off the ball park, as inlet noise just wasn’t noticeable which was a pleasant surprise …… It could well be a different story from the saddle though! 🙄
So what next? Well the plan is to get a day on a dyno when the weather is more amenable. I’d like to run it as standard, standard + new snorkel and Futura throttle bodies, new velocity stacks and new snorkel and see what the numbers say. Any guesses?
This website uses cookies to improve your experience. We'll assume you're ok with this, but you can opt-out if you wish.AcceptRead More
Privacy & Cookies Policy
Privacy Overview
This website uses cookies to improve your experience while you navigate through the website. Out of these cookies, the cookies that are categorized as necessary are stored on your browser as they are essential for the working of basic functionalities of the website. We also use third-party cookies that help us analyze and understand how you use this website. These cookies will be stored in your browser only with your consent. You also have the option to opt-out of these cookies. But opting out of some of these cookies may have an effect on your browsing experience.
Necessary cookies are absolutely essential for the website to function properly. This category only includes cookies that ensures basic functionalities and security features of the website. These cookies do not store any personal information.
Any cookies that may not be particularly necessary for the website to function and is used specifically to collect user personal data via analytics, ads, other embedded contents are termed as non-necessary cookies. It is mandatory to procure user consent prior to running these cookies on your website.
 Yes indeed it is all over. No, not the love affair with the venerable Caponord!! The three week holiday to Spain and Yorkshire (UK Caponord rally) is over and boy do I miss it already. Throughout, the Capo ran very well with only one odd fault for a couple of days that miraculously fixed itself – now that’s my kind of fault. It started just before I left … the RPM was slightly elevated at approx. 1,500 instead of the 1,250 set in the ECU. I hooked it up to TuneECU and hit TPS Reset and it dropped instantly – all good. Then a couple of days later, on the way to the ferry at Portsmouth, I noticed it was elevated again. Over the next couple of days it seemed to fluctuate between 1,250 and 1,500 for no obvious reason – raising or lowering at will. Then it just went away and has not come back since. All very strange. My guess is that it may have been a bit of stiction in the throttle plates that freed itself up with the daily use in Spain. But I guess I’ll never really know for sure.


 useful. Firstly, the front axle spoke-carrier had a rebuild with new 3D printed parts in a stronger material that looks better. Secondly, the top-box got a new 3D printed warning triangle finished with reflective tape and in the middle a 3D mounting for a 50-second Firestick (fire extinguisher) ….. all recessed into the foam lining so it doesn’t affect luggage capacity, nor add noticeable weight to the lid – a win-win! This was all topped off by a set of luggage bags from xxxx made especially for the Raid aluminium luggage. 1x large bag for the left hand pannier (main “hotel” bag), 1x large bag for the top box (bulky items and tech gear) and two half-sized bags for the right hand pannier ( secondary “hotel” bag and tool/spares bag). These were worth their weight in gold on holiday and I’m so glad I had them made – perfect!
 Sometime way-back-when, I bought a used set of throttle bodies off an RTS Futura (51mm v Caponord 47mm) with the view of doing some tuning/comparison work on the Raid with the 3D printed hybrid velocity stacks (51mm diameter but Caponord height). What really happened though was far less glamourous and only involved a sturdy box and a shelf! But about a month ago I dug them out again and realised that I pretty much had all the ingredients required to do a full clean and rebuild. I had stainless steel 4x10mm and 5x12mm Torx screws on the shelf as well as all necessary seals. The ultrasonic cleaning bath would do the brunt of the work and I could send the injectors away for professional cleaning at a reasonable cost.
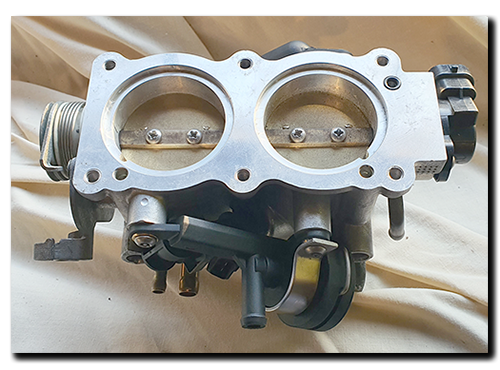

 As Guinness said, “Good things come to those who wait” …… and boy have I waited! When the new grips went on in late November, they were accompanied by the 3D printed temporary bar-end mounts. The clock was ticking, I had to get the grown-up adult versions (stainless steel!) made up asap as I’d no idea how long these things would hold up. In early January someone stepped in to do the deed.
 So just when I was giving up on ever seeing a set, a mate offered to help, and in the blink of an eye made these beauties! They fit perfectly and the finish is brilliant – what more can I ask for? So a huge ‘Thank you’ goes out to Jason – stand up, take a bow, don’t be shy fella! The eagle-eyed will notice a change from the rendering (and drawing) in that the flats (for socket or spanner) were left off. This was to reduce machining time and also because they only really need to pinch up – I’m not torquing the nuts off an axle here!
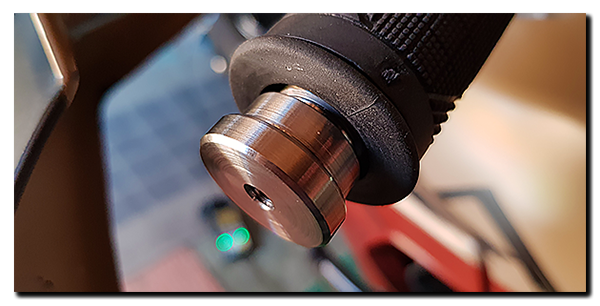


 quite possibly my biggest gripe of the K1 system. The button isn’t waterproof and the LED is so weak as to be almost impossible to see except in a dimly lit room (or car interior?). I decided to strip it to find out what makes it tick, then set about replacing it with something more useful.

 As I write, a swanky set of Futura throttle bodies are winging their way here, as are a nice new pair of Mk2 cam chain tensioners – AP0236253. The
  With plans a-foot to assemble a big-cc motor for the Capo, it was time to cast an inquisitive eye over the airbox snorkel, that ugly rubber protrusion at the front of the airbox, sucking in hot air from on top of the radiator. This one object has been debated far and wide over the years – keep it, or remove it? Yes the questionable snorkelectomy!


 With a bead of sealant and 4x M4x12 and 4x M5x12 screws and nyloc-nuts, the snorkel fits into place just fine. Of course only time will tell how well it stands up to the rigours of its new home! The OEM snorkel has a rubber/foam acoustic panel (AP8117151) that fits over it and of course it won’t fit the new one, so I’ve trimmed this one to suit(ish) and placed an order for a similar dual-material sound deadening product to make a new one specifically for this snorkel. However the chopped-about old panel can’t be far off the ball park, as inlet noise just wasn’t noticeable which was a pleasant surprise …… It could well be a different story from the saddle though! 🙄


