New page added – Rear Suspension Linkage

Aprilia Caponord ETV1000 Rally-Raid - 3D Rear suspension linkage
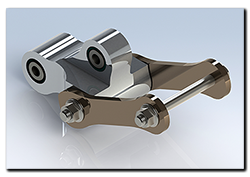
Yes, a new page added under ‘Chassis’ in the drop-down menu after installing the Brucaliffo supplied rear suspension linkage overhaul Kit. An excellent and comprehensive kit of parts and tools. I adapted it slightly from the original documented installation procedure (available here in Italian), nothing too radical though.

There is a slight issue with the alignment of one bearing, but it’s not a problem ….. and it’s all explained on the new page! I hope you find it useful.

Wot’s that switch then eh?

Aprilia Caponord ETV1000 Rally-Raid - 'Service Mode' switchA couple of keen-eyed readers have asked about the switch behind the riders saddle. Well, no mystery really ……. I got fed up with removing the saddles then rummaging around next to the battery to find both halves of the service connector – bloody inconvenient is what it is.

So I dropped a small waterproof switch into the bodywork behind the saddle. Now I just remove the rear saddle, flick the switch and I can reset the ‘service’ indicator and check out any error codes quickly and easily, no fuss, no scuffed knuckles.


Putting the Cat back ….

Aprilia Caponord ETV1000 Rally-Raid - puuting the 'cat' back!The Quill Evo2 cans and link pipes had been on the Capo for a couple of years and sadly, never fitted properly. After spring I gave up waiting for a replacement left hand link pipe from my to-busy pipe bending chappie, so I decided to go back to standard cans. Then realised after 5 minutes – bad move! Way too muted, woolly and heavy! I wanted the best of both worlds!!!

So in August, after much pondering, I went for a hybrid system. The standard cans were cut from the their link pipes andAprilia Caponord ETV1000 Rally-Raid - Mikalor W2 55-49mm stainless clamps the remaining weld ground down to suit the external diameter of the Quill can inlet. An adapter sleeve made from stainless was fabricated to fit the Aprilia 45mm pipe to the internal 54mm of the Quills. These were welded onto the link pipe and the cans held in place with Mikalor stainless steel clamps and a little exhaust paste on assembly ensured a nice gas tight seal. Now the system also has a more robust three point mount compared to the Quill original two point.

Aprilia Caponord ETV1000 Rally-Raid - Quill Evo2 exhausts on stock Aprilia link pipesThe Aprilia link pipes are 45mm diameter and have Catalytic converters installed compared to the free flowing Quill ones – straight through 50mm, so generate a little more back pressure, not as much as the standard silencers though. The benefit has been in the sound department, the Quills still have the wonderful base-burble, but have lost the sharp edge … the ‘bark’ that they had before, making them much more pleasant to ride with, especially for the pillion!

So for me it’s been a win-win on this one. Looks, weight, sound and fit.

Map tweaks in the UK were minimal, suggesting the link pipes make little difference; as suspected, the standard cans are the biggest restriction.

A mouse in the works

What with the mild winter and the vastly improved road surface, I’ve been lucky enoughAprilia Caponord ETV1000 Rally-Raid good times! to use the Capo far more than previous winters. That has meant the Range Rover languishing in the corner. And that has been the cause of yet more trouble.

One man’s car is another mouse’s home, especially when it sits day-after-day slowly dropping to its bump-stops and enticing grass and weeds to grow through the wheels. So muncher-mouse duly set up home under the battery compartment lid and made a comfy nest – from the bonnet liner, cable insulation and some hoses!

The car still started and ran, but what a mess! So I served the little darling an eviction notice (waved a big fluffy chicken!) and took stock of the damage. All this meant a trip to town for spares, so on an obscenely sunny afternoon, I took the Capo for a whiz around Pescara.

Long-story-short, I got the bits I needed AND luck would have it, I got the last bit of aluminium chequer-plate (on sale!!) to finish off the capo pannier lid modifications I started a couple of years ago. I already had the marine grade stainless steel tie-down points and hardware on the shelf, but the plate just seemed to get forgotten each time we’d been in-store.

So the Range Rover got shiny new cables and pipes and the Capo got the topbox make-over I’d waited aeons to get around too. All-in-all, a tidy result.

Oh and the mouse? Last I heard it was doing impressions of a dog whistle at Mouseville!

Hyperpro ho ho!

Aprilia Caponord ETV1000 Rally-Raid - Hyperpro rear springIf you do nothing else to your Capo this year, do this. Fit a Hyperpro spring, you won’t be sorry! The RR got this upgrade back in September and frankly it’s been smiles ever since. To top it off, Jan and I recently took the RR shopping … not in itself the most interesting of pastimes, but it’s how the Capo fared that was the real eye opener.

This was the first time I’d run two-up and with full luggage, 52Kg of luggage to be exact – and I didn’t have to adjust the pre-load. The bike took everything in its stride, including the obscene gale force winds that brewed up in the afternoon. It was also a real pleasure that the side stand could still be extended and retracted while fully loaded something that was impossible with the old spring, while using the center-stand doesn’t induce a popped hernia anymore. Absolutely fantastic! Excellent, balanced suspension with good ground clearance maintained …. can’t be bad for £80!

Hyperpro spring fitted – typical side stand clearance with the bike upright

Unloaded: 70mm    Rider only: 50mm    Rider+pillion+50Kg luggage: 20mm

Shorai batteries now in the UK

It’s a lovely warm afternoon and I’m stood holding a little lightweight box with two terminals …. It’s a fake, a toy, it has to be. This simply cannot be a real battery!

Some sleazebag once tried flogging me a wooden camcorder in bubble wrap at a French fuel station, luckily I rumbled him. I’m starting to have a sinking feeling, maybe I’ve been stitched up like a kipper this time. No way is this a battery, no siree Bob!

The thing is though, the Shorai LFX18A1-BS12* is indeed real, and yes, it does only weigh 0.96Kg against the portly 4.6Kg that the YTX14 tips the scales at. It can weigh as little as a budgies fart and pack more punch than a high power version of the standard battery because of the lithium-Iron technology it uses, frankly it’s way over my head but if it works, I’m all for it. Here’s the bullet points the technology is supposed to offer:-

  • Fraction of the weight of traditional batteries
  • Faster cranking for better starting
  • Faster charging
  • No lead or explosive gasses
  • Twice the service life

 What’s in the box? Firstly, a neat carbon composite battery with a measured floating voltage of 13.36v – that’s about 90% charged, exactly what the website says it should be. The box also contains an instruction leaflet, stickers (ooo!!) and lots of adhesive backed foam strips to pad out the little darling to fit your battery bay nice and snug like. It only took a few minutes to match up the foam to pad out the Shorai to YTX14 dimensions, then ease it into the battery bay and begin reconnecting the cables. One nice touch is that all the terminal nuts have a piece of foam pre-attached to hold them in place and hence, make bolting the wires in much easier … a simple thing, but much appreciated!

So the proof of the pudding, the first start. Nothing much to say really …. It started up nice and strong like it had always been there, absolutely amazing! It settled down to a normal 14.2v charge at idle and I left it for about 10 minutes and then turned the bike off. I went back the next morning and measured the floating voltage – 14.04v …… about 95% charged! So even in the few minutes I ran the bike, it had taken charge and dropped nothing overnight. This is looking promising!

The YTX14 that came out is about 3 years old and a quality make, but has started to show signs of distress over the past few weeks. So I think it fair to consider it life-expired and so use its cost/life as the yardstick with which to measure the Shorai unit.

This then is day 1, I’ll write periodically over the coming months about its performance, especially on balance with the YTX14 it has replaced. Hopefully in the next few weeks I should be getting the Shorai SHO-BMS01 charger to use directly into the batteries own port and then I’ll see how it fairs in ‘storage mode’ for the winter period.

The Caponord (all years) can take either the standard fitment LFX14A1-BS12 or the higher powered LFX18A1-BS12, they are both the same case size.

UPDATE 2014

Shorai have now replaced the original battery model for the Caponord/Futura with the LFX21A6-BS12.

Quill Exhausts – new straps in a Jiffy!

It’s nice to write something positive especially when it’s a British company involved! Some of you may remember that I didn’t have the best of dealings with Quill Exhausts in 2009. Well last month I contacted them again by email and this time – wow, what a difference! I enquired about a new silencer strap as I lost one and have been using a flimsy ‘universal’ one since. In the end I got two …… free ….. yes, free! Just send a pre-paid jiffy bag and we’ll have them in the return post, I was told … and sure enough, a couple of days later they arrived. So firstly, thank you James at Quill Exhausts for your exemplary customer service and quick email replies, I’m very impressed, thank you. And secondly, thank you to Jim Smith (Abbey Motorcycle Instructors) for sending the Jiffy bag on my behalf, you sir are a star!!

Colour wiring diagrams

It’s not often these days that something really useful comes along, but Chris Elms has pulled one out of the bag! He recently popped over to the AF1 Caponord forum and quietly dropped off two wiring diagrams. Nothing new you might think – we’ve had wiring diagrams with the workshop manuals for years.

But these are different, in all the right places …. Chris has reworked them with all the wires now in color, extra technical details added and above all – layers!  The ability to select or deselect sections of the wiring loom, making it much clearer and easier to trace specific wires. That feature alone is worth a King’s ransom, absolutely brilliant. You need Adobe Reader to open the files (PDF) or a program cabable of opening that file type. If your browser is able, view the standard or ABS versions here, or download them from the menu bar.

Chris has kindly given Moto-Abruzzo permission to host his wiring diagrams. Thanks again Chris!!

Brew ha-ha!

I’ve written before about the good and bad points of the Aprilia (Rimowa) panniers, but one of the niggles I never mentioned was the carry handle on the lid. I never use it and the damn thing gets in the way.

So after a happy couple of hours cutting, sanding and drilling … they’ve been replaced by a nice piece of checker plate. A vast expanse of flat surface on which to make a brew and sort out my sarnies and nibbles. Smashing stuff!

Now I’m looking for a set of ‘pannier-top’ bags to finish off the job … bags to put the afore mentioned sarnies and tea brewing paraphernalia into. No more unstrapping panniers to delve inside for munchy stuff, it’ll all be on hand at the ‘zzzz‘ of a zip ….

Just call me ‘Hornblower’!

As an Bike Instructor I’m almost daily pointing out what the Highway Code has to say about the horn:- It’s ‘there to alert others of your presence’. In other words, use it if necessary to avoid a developing hazard becoming a major incident.

When something affects your safety, real or perceived … give a quick double tap of the horn! One long blast just puts peoples backs up, it’s aggressive, a double tap of the button can be an ‘Oi I’m here!’ as much as a ‘Hello, haven’t seen you in a while’ …. it’s ambiguous and inoffensive, but gets attention none the less. It’s a tool – use it if it’s going to help!!!

This is all well and good, if you happen to have a decent horn that is……

So the other afternoon,  there I am, cheerfully taking avoiding action with my thumb jammed on the horn button as my right knee is tickling the driver’s door handle of a VW Golf that not only didn’t stop for a Stop sign …. but jumped the junction at a paint-peeling pace to boot. Not only did she not look, she’s still sublimely oblivious to the impending 350Kg  of lap-Capo heading her way!

In amongst the swerving, braking and tutting …. I realised that the tooting element  wasn’t doing much in the way of attracting attention. Sad to say the toot was more like an ants asthmatic wheeze. My fault really, I said it back in 08 and I’ll say it again, the damn horn that Aprilia fitted has to go!

Back in the relative calm of the barn, I reflect on the moments entertainment and vow by Beelzebub’s butt, I’m not having that happen again in a hurry. I want the horn replaced, improved – something more blessed with decibels. Not quite a wall breaker, more a bowel shaker! There is it turns out, but one horn that fits the bill ….. the fearsome Stebel Nautilus.

So a ‘Nautilus Compact tuning’ in black is ordered from Fleabay and I set about making mounting brackets to fit it where the ABS unit would go if I had ABS, which I don’t. It fits nice and snug in the space below the relays and coils, behind the rear suspension unit and seems to be pretty well shielded from road crap. The existing Grey horn wire behind the headlight, is tapped into, shielded and run back to the new relay. Yes, the horn needs a relay to operate as it draws 18A … that’s a toasty 216w … or 10 sets of heated grips worth of electricity to you sir! And yes, before you ask – it’s protected with a waterproof 20A fuse. So now the existing horn and the new one work in parallel … if one fails, I have a backup!

Of course I’m biased, I think it’s better … but the real test ladies and gentlemen, the definitive before and after toot-test, is for you to decide.  Place your ear close to the speaker … closer than that, close your eyes and concentrate. Can you, discerning listener, tell the difference?

[audio:https://www.moto-abruzzo.net/wp-content/uploads/2011/06/Stebel-Nautilus-Compact.mp3|titles=Std Horn V Stebel Nautilus Compact]