No1 component that fails on a dashboard…..

Yes, today I’m dishing the dirt on the number one bad-boy component on the Caponord and Futura dashboard. Or more to the point, why this sad little part earns this unwanted reputation! What is it? Well it’s a rather innocuous SMD radial electrolytic capacitor rated at 16V 47µF.

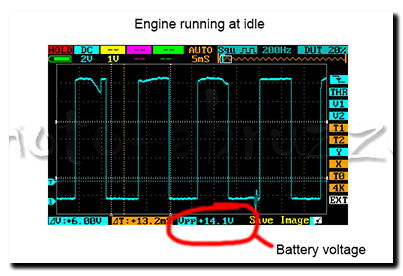
Over the past couple of years, I’d say that 70% of contacts via the website have involved this component in one way or another …. and that percentage is steadily increasing! Why? Simply because of the constant and unstoppable tick-tock passage of time. Unlike most electronic components, electrolytic capacitors have a given life span based firmly on operating temperature and duration. What does it do? In a nutshell, it smooths out the 5V DC power rail … without it the rail contains a nasty AC component and that really upsets the microcontroller!

First I want to look at the symptoms this little guy causes when it begins to shuffle off to the electronic afterlife:

  • Dashboard dead except for Oil, Neutral and Side-Stand LED’s – Especially when cold.
  • After sitting in the sun or being heated during a ride-out, it may spring into life, or flicker on and off rapidly. This is the clincher!

Of course, to be 100% sure, we have to get down to the circuit board and identify the component first:

Aprilia Caponord ETV1000 & Futura RST1000 dashboard capacitorSo there it is, just to the left of the voltage regulator chip. Now I’m sure the eagle-eyed amongst you will have noticed that there is a similar (in fact identical) component to the right of the regulator …… why is only the one on the left a problem then?

Well the dashboard has two regulators in the one package, supplying two independent 5V power rails. One is powered permanently from the minute a battery is installed in the bike, the other only operates when the ignition is switched on. And there lies the answer to the question …… lets punch in some numbers. For the sake of argument, we’ve got a Capo that has done 5,000 miles in a year and averaged 50mph.

  • 5,000 miles / 50mph = 100 operating  hours for the right hand (switched) capacitor.
  • 365 days * 24hrs a day = 8,760 operating hours for the left hand (permanent) capacitor.
  • Now lets assume 10 years have passed …. now we have 1,000 / 87,600 operating hours respectively!

And there is the bottom line. After 10 – 16 years on the bike, the left hand capacitor is simply reaching the end of its working life long before its companion on the other power rail, and with each passing year more are failing …. It’s not a case of ‘if’ folks, it’s a simple matter of when!

Replacement is straight forward and has been done by quite a few owners over the years, but like most things, it requires a certain level of skill and experience along with the right tools for the job ….. without these, there is a very real possibility of damaging the tracks or adjacent components and making the board worse than when you started. You have been warned!

Keeping the postman busy

Aprilia Caponord ETV1000 RST Futura hybrid velocity stack 47mm 51mmAfter January’s awful weather – snow, rain, sub-zero temps, earthquakes & landslides, it’s been a very nice balmy February! So much so, that the Capo has squirreled a good few miles under its belt – the last 300 of them with the new snorkel in place. And I have to say, I’m really chuffed at how it performs. No extra induction noise that my aged arthritic lug holes can detect and no detriment to performance even though it’s been nowhere near a dyno to tweak the mapping.

Aprilia Caponord ETV1000 Rally-Raid cam chain tensioner AP0236253As I write, a swanky set of Futura throttle bodies are winging their way here, as are a nice new pair of Mk2 cam chain tensioners – AP0236253. The velocity stacks are now finished and ready to fit to the throttle bodies and so it just leaves the matter of swapping out the Anakee Wild tyres for a fresh set of Anakee 3’s and a DID ZVM-X chain and Ognibene front/rear sprocket set (courtesy of Motrag) and I think she’ll be ready for a damn good thrashing on Dr Dyno! 🙂


Hybrid velocity stacks

Aprilia Caponord ETV1000 Rally-Raid 47mm and hybrid 51mm velocity stacksIf all goes to plan, later this year the second Rally-Raid that’s currently being rebuilt, will finally get a motor installed. The plan is to use a big-bore motor …. an 1,103cc in place of the standard 998cc. The compression and valve timing will remain bog-standard Caponord (10.5/1  Inlet timing – 25°BTDC/37°ABDC and Exhaust timing – 57°BBDC/5°ATDC). However to accommodate the increase in air-flow, I’ve decided to use Futura 51mm throttle bodies instead of the Caponord 47mm items.

Meanwhile on top of this chunky aluminium marvel sits a pair of velocity stacks. These stacks vary in height (and diameter) depending on the intended tune of the engine. The RSV Mille of course is designed as a race-rep and as such wants high horsepower at high RPM – hence 57mm throttle bodies and very short velocity stacks. On the other hand the Caponord was tuned for improved low-end grunt and so has small throttle bodies (47mm) and tall velocity stacks to maintain good gas flow speed at low RPM. The Futura seems to sit firmly between the two!

Now of course I could simply use the medium height velocity stacks straight off a Futura, but I decided to go a different route and print a new pair of hybrid stacks – Caponord height BUT 51mm diameter to fit the Futura throttle bodies. Unlike ABS, Colorfabb Ngen (Co-Polyester) can’t be vapour polished with Acetone, so I’ll have to sand the venturi down with a variety of grades of wet-and-dry up to 2,000 grit and maybe finish it off with something like Quixx plastic polish – if it works on this stuff! Here’s a couple of pics comparing the original and new version – straight out of the printer!

Unfortunately 3D parts (unless made on high-end machines) don’t typically have the same strength as injection molded or machined parts – but they do make great ‘proof-of-concept’ parts! If these stacks prove to be a positive step forward, but not durable enough for the working environment, I can at least get the drawings to the machine shop and have them made in aluminium … but that’ll be a tad more expensive than 85p each off the printer! 🙁 

UPDATE

Just had a spare half-hour to rub some 100/400 & 1200 grit paper down one of the stacks and all I can say is – WOW! This material rubs up lovely and probably a couple more sessions will see it through. All the print-ridges have gone and I can’t feel anything but a nice smooth surface that retains a print pattern that makes it look quite distinctive.  🙂

Aprilia Caponord ETV1000 RST1000 Futura Rally-Raid hybrid velocity stack


(UK) Replacement seals for Capo/Futura clutch system

Aprilia Caponord ETV1000 Rally-Raid & RST Futura clutch system master & slave sealsRecently while visiting the AF1 Futura forum, I saw an interesting thread about replacement clutch master / slave seals (common to both Futura & Caponord) sourced in the UK at a very good price and thought the information well worth sharing here.

The thread was started by a UK owner – Corsehf (Andy) in which he quotes replacements for all the  master / slave cylinder seals from one supplier. Seal details and individual prices are:

  • Master Cylinder Seal – Lever End: SU12-6.9-4DE-EP-S-DK101 – £2.50
  • Master Cylinder Seal – Spring End: SU12-5.2-3.8-EP-S-DK106 – £2.50
  • Clutch Slave Cylinder Main Seal: SU112078-018DE-EP-S-DK101 – £2.79
  • Clutch Slave Cylinder Piston Pushrod Seal: SS8-16-7-SC – £1.60

That’s a total of £9.39 + Vat = £11.27 plus package & post. So for somewhere around the cost of one genuine slave cylinder seal, we can buy ALL the seals needed for a full clutch system rebuild. Not bad in my books! If you’re interested, call Rebecca Pattinson at FPE Seals on 01325 282732 or email: [email protected]  If you do decide this is for you, then please drop by the thread and offer Andy your thanks …. he’s just saved you a pocket full of money!

So I’ll end with a big thank-you to Andy, then get a set on order and nip into the barn to dig out that old master cylinder and finally get it re-coated and re-sealed, then swap it for the brake fluid damaged one on the Raid ….. oh happy days! That things been bugging me for years.

Stuff …. 6 months and 12 months on

Aprilia Caponord ETV1000 Rally-Raid dashboard - new right-hand indicator repeater!A couple of anniversaries this week ….. firstly the dashboard. Yes a full 12 months since it was finished and put back into the Capo for the last time, resplendent with its new inlay to complement the electronic changes. The auto-dimming back lighting and split indicator repeaters have been absolute winners – I couldn’t go back to a standard board again without missing them. Moving the side-stand and low-fuel lights toAprilia Caponord ETV1000 & Rally-Raid Voltmeter and re-located side-stand light on dashboard accommodate the twin indicator repeaters has had no impact, positive or negative. The voltmeter has been a different kettle of fish …. generally unused as the Sparkbight battery monitor handles voltage feedback when riding around – however it has proved a real benefit during start-up when the dashboard goes through its self-test phase. Now it’s become second nature to eye-ball the tacho needle to see what the battery voltage is pre-start. >12.6v and I know I should get a good kick from the battery!

Aprilia Caponord ETV1000 & Rally-Raid MCCruise controlThe second anniversary, although shorter at 6 months and a tad over 11K miles, is the MCCruise cruise control. After a rushed install (not clever) I knew I had a heavier throttle than pre-installation ….. this was purely down to throttle cable routing and nothing to do with the cruise control itself. It simply didn’t like being re-routed behind the radiator, so I gave up and relocated the CIU (cable interface unit) to a new location by the throttle bodies. Now everything works fine – a light throttle and a happy cruise control. It’s been 100% Aprilia Caponord ETV1000 & Rally-Raid New MCCruise CIU locationreliable and functional. As a demonstration of its finesse I ran the bike in 1st gear at 25mph and let the cruise control take over the (100 horsepower!) throttle – all I can say is WOW! I would never have believed that the system could have the sensitivity to operate the throttle with such precision, but it did – up hill, down dale – never an ounce of jerkiness. Ok I admit no one wants to ride around in 1st gear …. but as an experiment, it proved to me that MCCruise have indeed developed an absolutely fantastic piece of kit.

TuneECU for Android is now out

TuneECU for Andriod on Google Play StoreOn the 15th September 2014 the eagerly awaited TuneECU for Android app was rolled out on Google Play Store priced at €9.99. It doesn’t currently support reading or reprogramming of maps through Bluetooth only via cable, but it is version 1 so this may be added at a later date. Either way, it’ll make a handy pocket diagnostics tool and save luggage space leaving the notebook at home!  Here’s a link to the TuneECU webpage where you can read more about what’s needed to get it working on your Caponord.

It might be nice to look at putting together a fully waterproof Bluetooth module/cable that can be left permanently attached to the ECU, maybe with a remote switch in the luggage tray to power it on/off ….. another winter project! 😀


New fault code

Aprilia Caponord ETV1000 Rally-Raid. A tacho .... but not just any old tacho, oh no. In fact if Carlsberg and M&S made tacho's......A few days ago while doing a bit of investigating for an AF1 forum member regarding the tachometer signal from the ECU, more specifically what would he observe on a multimeter instead of an oscilloscope, I momentarily shorted the tacho line against the chassis with the bike running. The tacho shut down and the bike just kept chugging along quite happily – no EFI light, no tacho. Recycling the ignition bought the tacho back to life and it’s been fine ever since ……… but two points came out of this that may be of use to other owners.

  • Check for a fault code with TuneECU – ‘P1386 Tachometer, open circuit or short to ground’ 
  • When the ignition switch is first turned on the Tacho line should show a solid DC battery voltage – if you don’t see this the ECU may well have shut down the output to protect it. Only once the engine starts will you see this signal:-

Aprilia Caponord ETV1000 Rally-Raid tachometer signal

Anyway, just a quick observation, a new (to me) fault code …. one to file away in the compendium of Capo facts. It certainly proves that the tacho signal isn’t just a ‘dumb’ signal, it’s one the ECU monitors and protects as neccessary by shutting it down.

New ‘Lockwood’ inlay fitted at last

Right indicator repeaterOn 4th February Jan came back home with a suitcase fair groaning with all manner of goodies. The most eagerly awaited though, was the pair of new inlays from Lockwood International Ltd. So first impressions?

Excellent! From the textured material to the bleed-free printing, from the fit to the light-transmission …. everything was exactly as I’d hoped. The first thing I did was pop one onto a waiting chassis/board and turn on the lighting – did the text and colour match the light channels? Again, perfectly. Now I could relax, prepare the new chassis and get ready to fit one permanently to the dashboard. To fix it in place I decided to use a general-purpose spray adhesive and did a trial run on an old chassis/inlay to make sure it would be suitable. Everything seemed fine and it was certainly good experience to do a dummy run.

Making sure the chassis was grease and dust free was essential, then masking off the light-channels, mounting pegs and anywhere else I didn’t want spray glue to go! A couple of thin coats of adhesive were applied and the inlay fitted 10 minutes later to allow time for the solvents to evaporate. Perfect! It was now ready to be fitted to the circuit board, but first a couple of modifications to the board/processor circuits.

First the eeprom file needed to be updated for the Futura speedo/tacho, then the code in the microcontroller needed updating for the different (voltmeter) needle calibration. At the same time a couple of modifications were made to the circuits based on insights I’d picked up about Arduino boards from the Internet, also the auto-dimming circuit was finally added for the variable back-lighting, a bit of tweaking with the code – and it was all ready to be refitted to the Capo.

So there I was …. on a wind-swept but warm Sunday morning, dashboard in hand and about to see the fruits of a few months work finally come together on the bike. No doubt the code for the auto-dimming will need fine-tuning, but that can be done without removing the dashboard again – and that’s the line in the sand, right there. Once fitted, I shouldn’t have to remove them again anytime soon …. and that’s a great feeling!

I think that about now would be a great time to pause and say thanks to a few folks who have helped me keep the momentum in this little project. Firstly Jan for her patience and for lugging stuff across the continent for me, to Andy (beasthonda) for bouncing ideas around with me and his interest in the project, to Arvdee in the USA without who’s generous donation of a Futura inlay I wouldn’t have had a template.  Last but not least, Clive from Lockwood International for putting the proverbial icing on the cake – thank you all!!!! 😀

A Futura dashboard from over the pond

Dash1Last winter and again a few weeks ago, I put an advert on the AF1 ‘Aprilia Parts Wanted’ forum for an RST Futura dashboard or inlay and other than a very tedious (and obvious) spammer, it was deathly quiet. I kept scouring Ebay and numerous on-line for-sale sites but it seemed like the world’s supply of Futura dashboards had vanished into thin air ……… until Arv (Picky) sent me a PM through the Aprilia forum.

He had a Futura dashboard that didn’t work and had a broken lens but was fine in all other respects. This sounded just what I was looking for because in reality I ONLY need the inlay anyway. So we swapped emails and Arv sent photo’s and a video. Total cost …… p&p only, I could have the dashboard for free!! USPS said 6-10 working days …. it was on my doorstep in 5, now that IS service. Read it and weep DHL!!!!!  👿

And so I’d like to thank Arv, not only for his generosity and honesty, but for getting the thing packed and away in the mail before I’d even got the payment to him. Arv it turns out, hails from White Plains, New York and fills his days with computer wizardry and his spare time travelling on his beautifully sorted Futura with is wife.

Today I’ve fitted a small piece of his Futura into my hybrid dashboard and as I finished the job off, I felt it was also fitting that a part of his bike had found a new lease of life and returned home to Italy. Arv you are a credit to yourself, your family and the AF1 community and although we’ve never met, or spoken, one day on that round-the-world trip I’d like to buy you a cold beer and shake your hand.

A little light circuit training

Aprilia Caponord ETV1000 Rally-Raid - Dashboard large LCD panel
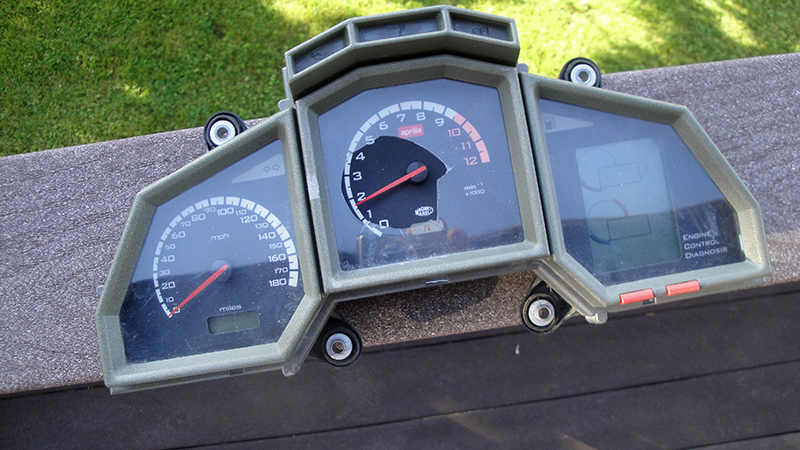
On a previous post I mentioned a visit by Mike081. During his stay I said that I’d like to get hold of another instrument panel at some point, so I could look into the circuit and programming in more detail. It just so happened Mike had a board lying around and he promised to sent it over. Well, true to his word, a Mk2 Caponord board was sat on the post-box when I got back home the other day. Cheers Mike!

First, I made a stand to support the little beauty while I prodded and poked around withAprilia Caponord ETV1000 Rally-Raid - AutoCAD circuit layout my trusty multimeter. The next job was to try and fix it! The board had a couple of problems, a high resistance track and faulty regulator but nothing too taxing. Next up, I photographed the front (high resolution pic here) and back, then imported them into AutoCAD and started the tedious task of unravelling the tracks and components (click on pic).

Next up, the EEPROM. The little memory chip that contains settings and data relevant to the running of the board and recording of mileage and trip.

Aprilia Caponord ETV1000 Rally-Raid - dashboardTwo AF1 forum members – Michele (MCR) and Andy (Beasthonda) have been forefront in unravelling the data on the chip and how it alters the way the board works. The bottom line is that instrument panels from both the Caponord and Futura can now be reprogrammed in various ways and used on either bike. This also means that the ability to safely recover boards that have reset to factory default is now possible.

I’d like to thank both Andy and Michele for including me in the email exchange and for sending data and documents so I can better understand the particular settings for each bike – Cheers gents, you’re the best!

So this week I’ve experimented with the alternative settings and sure enough my little board has changed from Caponord to Futura and back and dabbled in metric and imperial measurements and even been a hybrid – Caponord with Futura LCD display and Speedo/Tacho calibration.

Aprilia Caponord ETV1000 Rally-Raid - dashboard