Ruba-dub-dub …… one Capo to scrub!

Aprilia Caponord ETV1000 Rally-Raid. Twinkle twinkle little Capo ......As we fast approach the fun and games of ACIM, I figured it was time to reintroduce the Capo to two things frequently lacking in its life ……. washing and polishing. Yes, the hose pipe, chamois leather and Salvol autosol have been dragged out, dusted off and liberally applied to said Capo. My how she twinkles now, well as much as matt paint can ever twinkle that is!

Aprilia Caponord ETV1000 Rally-Raid. High mileage DID ZVM2 drive chainUnfortunately for the Capo, there has been one cleaning job on the list that I’ve been putting off, and I have to admit that the list was written several years ago – the rear wheel refurb! After a couple of cold ones, I finally mustered up the courage to tackle the gunked on grease, the lashings of welded road crud and the inevitable rusty nipples. It nearly had the better of me once or twice, but tenacity and sheer bloody-mindedness (plus a couple more cold ones!) saw the job through to the bitter end. And here’s the finished article, not too shabby if I do say so myself ….. and that chain/sprocket have now got a whopping 38,730 miles on them!!!

Before it all went back together, the Scottoiler dual-injector was checked over as were all the bearings, seals and cush-drive rubbers – and of course it would have been remiss of me to have not taken the front sprocket cover off and give it a Mk1 eyeball check – looks OK for now, but I’ll get one on order!  😉

mccruise ……. active electronic motorcycle cruise control Pt1.

MCCruise cruise controlLet me start by saying that as of now, the cruise control project I’ve been working on has been put on hold indefinitely ………. why?

A couple of weeks ago I contacted MCCruise in Australia about buying a couple of parts to make my own cruise control install go a little easier – off the shelf stuff, not impossible to do myself, but just easier to purchase rather than make. After a lengthy phone call with Tony Guymer, I was convinced to take an in-depth look at the new electric servo kit* with the view to fitting it to the Capo. Unfortunately, of the current 120+ kits they make, none are for Aprilia. I’d have to start with a universal kit.

Now I’ll say loud and clear, here and now …… I’m not keen on the word ‘universal’. So the idea of a universal kit just doesn’t do it for me at all and that goes for a cruise control. Maybe it’s just me, but I hate the one-size-fits-all approach to anything, they never quite look right, not factory-fit enough for me I guess. No, it has to be a bespoke kit to fit the Capo and this is where Tony eventually sold me on the idea.

Aprilia Caponord ETV1000 Rally-Raid. Mock parts and mounts tested for fit, in this case the 'CIU' that connects the throttles.Tony suggested that if I were to get some data from the Capo – measurements, connector types and locations, wiring routes and mounting places for the main units, then between us we could map out a bespoke fitment kit, a kit as close to plug’n play as is possible. Now I like that idea and being able to get involved is the icing on the techie cake for me!

So last week the Capo was stripped …… dozens of photographs, pages of notes and CAD plans for mounting brackets were compiled and sent to the MCCruise in-tray. After a few quick techie emails back and forth, Tony gave the green light on the kit and as you read this it should be working its way across the planet to little old me!  😀

I just hope that after all this time, effort and expense my wobbly-wrist appreciates it! 😉

At the end of the day, they need to sell 10+ kits for it to be viable for them, so to offer a helping hand I’m hoping to have something to show at ACIM in a few weeks time and I’ll also stick a few flyers on the bike when its parked up to nudge a bit of interest.

*Tech details in Pt2. / **Fitment details in Pt2. as well, kind of a Pt2+ I suppose! 

TuneECU Andoid app in the pipeline!

TuneECUI just popped over to the TuneECU website and saw a ‘NEW’ one-liner tucked away below the latest TuneLibrary.dll download link on the front page ……. I almost missed it, did a double take and followed the link in a flash ….. and I’m glad I did!  It certainly looks like those clever folks have been busy, three nice screenshots of an Android TuneECU app. Shown below courtesy of Tom.

So I fired off an email asking for permission to use the screenshots and to enquire if the software would work with the Caponord and although not 100% sure at the moment, Tom’s pretty sure it will …. he just needs more information back from the programmer. So bookmark tuneecu.com and keep watching!

New fault code

Aprilia Caponord ETV1000 Rally-Raid. A tacho .... but not just any old tacho, oh no. In fact if Carlsberg and M&S made tacho's......A few days ago while doing a bit of investigating for an AF1 forum member regarding the tachometer signal from the ECU, more specifically what would he observe on a multimeter instead of an oscilloscope, I momentarily shorted the tacho line against the chassis with the bike running. The tacho shut down and the bike just kept chugging along quite happily – no EFI light, no tacho. Recycling the ignition bought the tacho back to life and it’s been fine ever since ……… but two points came out of this that may be of use to other owners.

  • Check for a fault code with TuneECU – ‘P1386 Tachometer, open circuit or short to ground’ 
  • When the ignition switch is first turned on the Tacho line should show a solid DC battery voltage – if you don’t see this the ECU may well have shut down the output to protect it. Only once the engine starts will you see this signal:-

Aprilia Caponord ETV1000 Rally-Raid tachometer signal

Anyway, just a quick observation, a new (to me) fault code …. one to file away in the compendium of Capo facts. It certainly proves that the tacho signal isn’t just a ‘dumb’ signal, it’s one the ECU monitors and protects as neccessary by shutting it down.

That’ll teach me!

Cruise servo in place at the back of the tool trayHi all ….. a quick post about the cruise control and a word of caution!

I finally got the cruise control servo unit mounted into the tool-tray of the Capo today. A relatively straight forward job, requiring only a minor rework of one of the mounting lugs, a new bracket fabricating and a couple of holes drilled in the under-tray.

The old throttle cable was removed from the unit and a new 6mm Teflon lined sheath fitted ready to run forward to the throttle bodies. It fits a treat down the side of the two 30A fuses and there’s already a cut-out in the undertray for it to run through, talk about made for the job! I’ll refit the old in-line adjuster and look at routing it along the engine/throttle bodies next week. So far so good!!! 😀

And so everything had gone beautifully, with a final firm slap the rear seat was locked in place …………. Only to realise that the key would no longer release it! Yes the dreaded can’t-remove-the-rear-seat syndrome. My fault entirely, as I should have checked the cable-outer was secure at the latch when I put the luggage rack/deck back in place. So here for your info is how to sort out what seems a very daunting situation to be in. Others may have a different technique, but this one worked for me.

Firstly stop twisting the key harder and harder, while bashing the seat in a vein hope it will pop off ….. it won’t ….. The noise you can hear when you turn the key is simply the cable outer and spring moving – NOT the latch.

Secondly, remove the rear deck bolts (x4). Of course you may have to remove a topbox and associated mounting plate first – no one said it was going to be easy! Now grip the deck just above the rear light and lift, at the same time slide something like a ½” drive 12” extension into the gap to hold the deck up. You’ll need to get the extension right the way in, enough to expose the latch mechanism. With the mechanism visible, slide a flat bar or long screwdriver in and gently push on the tab where the cable end is visible – from the rear of the bike, push to the left. And you should hear a satisfying click as the seat pops up. Reseat the cable-outer, reassemble the bike and sink a cold beer, you’ve earned it!

What a muppet …. anyway, I hope you’ve learned a little something from my foolishness and don’t make the same mistake!

……. now to connect the servo unit to the throttles.

Finger on the pulse

Aprilia Caponord ETV1000 Rally-Raid. Speedometer pulse from the rear-wheel sensorWhile the wrist is healing nicely on light-duties and (thankfully) out of the heavy and restrictive cast, I’ve had a chance to play with the idea of an active cruise control for the Capo. An active system will adjust the throttle automatically to maintain a given speed even as the road rises and falls unlike a passive system which is nothing more than some form of throttle locking mechanism.

Arduino cruise control sketch
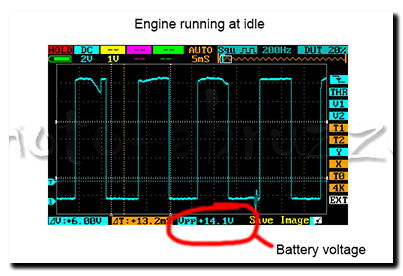
The system I’m thinking about will, when all parameters are met (speed, revs etc) lock onto the chosen speed when the ‘Set’ button is pressed. The microcontroller will then look at the error between the chosen speed and actual speed and adjust the throttle as neccessary to try and maintain the error at zero – this is done using PID (proportional-integral-derivative) in the controller. If cruise is stopped (operation of brake or clutch) or the PID error goes beyond a pre-determined maximum (high gear on a steep hill for example) the requested speed is stored and can be re-activated by pressing the ‘Res’ume button. And while in cruise, the speed can be adjusted in 1Kmh increments by using the same two buttons, now working as ‘Acc’elerate and ‘Dec’elerate. That’s the theory anyway!

Aprilia Caponord ETV1000 Rally-Raid. Opto-isolated and cleaned Speedometer input signalInputs

  • Power – 12v on/off switch
  • ‘Set/Acc’ &Resume/Dec’ buttons – 12v
  • Front and rear brake light switches – 12v
  • Clutch lever switch – 12v
  • Speedometer signal from the dashboard (output on pin 14 of the 16-pin connector) -12v square wave 85% duty cycle frequency modulated
  • Tachometer signal -12v square wave 50% duty cycle frequency modulated.

Honda GL1800 Cruise ServoOutputs

  • Two colour LED for power, cruise engaged & error codes – 5v
  • Motor drive signal – 5v PWM to motor control board.

To date the inputs and safety stuff has been written and from the tacho/speedo signals it’s calculating what gear the bike is in pretty quickly, but I’m sure it can be speeded up …… I just need to learn more programming! The operating parameters I’ve decided on are:

  • Cruise enabled between 50Kmh and 160Kmh (30mph – 100mph)
  • Cruise enabled between 2,750rpm and 6,000rpm but might change the lower limit to 3,250rpm in 6th gear
  • Cruise enabled in 4th, 5th and 6th gears only.

At the end of the day, I just want a system that will give my old worn out wrist a rest at motorway speeds on the run between Italy and the UK, taking into account the (very!) variable speed limits and ascents/decents especially through Switzerland. If it can do that I’ll be a very happy bunny indeed.

Of course this is all well and good, but I’ve got to get all the bits talking to each other first and make it robust enough for long-term and safe use on a motorbike ….. the problem is that in amongst all this enthusiasm my wrist still has a way of letting me know who’s really in control while swanning around on light duties!


It’s all in the wrist …

Talk to the hand ......Just as the last of the crappy weather ebbed away and thoughts of having a run out on the Capo sat warm and snug in the front of my mind …… life came along and handed over a great big slap in the face by resurrecting an old injury. Over the past five decades I’ve been fortunate enough to only break one thing in my ageing chassis – my right wrist, unfortunately three times!

For the past 13 years its been ‘unstable’ or so they said, certainly it’s dished out its fair share of misery from time to time, but always controllable with over-the-counter meds. Until this week, when ‘unstable’ finally fell off the proverbial perch. So now I know how a provincial hospital in Italy works ….. and I can only say a heartfelt thank-you not only to our own doctor in Civitaquana, but also all the staff we met at Penne hospital who made my visit a positive experience.

So now I’m trussed up like a Christmas Turkey, stewing nicely for another week before I go back to hospital. Meanwhile the sun shines, the road dries out and the Capo sits silent ………. I don’t rightly know which of us is more miserable! 🙁

That’s quite enough of that thank you very much! I’ve time to spare, a working left hand and a computer to play with – so how about designing an active cruise control to give the wrist a bit of respite on those longer journeys? Let’s see now, one microcontroller, a Pololu motor driver board and a GL1800 cruise module might just get the ball rolling …… it’s tinker-time!!!!! 😀

Capopedia.net ……. the resurrection!

Capopedia.netWell another wet’n windy Sunday is upon us yet again and I find myself scouring the small-ads for a boat, a bloody big boat capable of taking animals and motorbikes 2 by 2 …. Because if we have much more rain folks, I think we’ll be washed clean off the hill-side! A month now with hardly a dribble of sunshine ……  🙁

But in fairness it has given me chance to take stock and work out where I want to go Capo-on-the-internet wise. A couple of years ago I registered Capopedia.net and started a Wiki with the idea of using it as a repository for ETV1000 knowledge that could be refined and added to by the Capo owners themselves.

All well and good …… but I didn’t really get stuck into it, so others that signed up probably looked around and felt just as daunted by a blank bit of web space and didn’t come back! Now that’s my fault entirely and as the months rolled by I did nothing to address the issue.

So …… time to reflect. Is it a good idea anyway, or should I just hit the button and nuke the whole thing? It was close I don’t mind admitting. Cost, responsibility and a not least time & effort, versus content deletion, cancelling the domain name and saving a few bob. But what are the alternatives?

The internet hosts various Caponord forums of course, in many languages. But in English we’re pretty much used to one site only …. AF1. Forums are fantastic places for the exchange of ideas and information, the problem however is that the details get buried in a never-ending procession of new posts and threads, yes they can be ‘stickied’ but it’s not perfect. This can make access to the information difficult if not almost impossible at times, depending on how obscure the search is. Add to this the fact that periodically the host may purge the pages to save on storage space (archive them) loosing images and links they contain as they’re reduced to raw text and you can see that maybe they’re not ideal for information storage.

And so after some thought  the Capopedia wiki is resurrected. The software has been updated, login and new user structure (hopefully) working and a bunch of extensions have been added to make the whole thing a better experience for admins and users. As of this week I’m going to make an effort to at least put aside an hour or two each day to chip away at it …. nose to the grindstone, shoulder to the …… well you get the drift.

So if anyone is interested in becoming a Sysop (administrator) to help run the thing, I’d be glad to hear from you ………. 🙂

Rear suspension linkage – excess play

Aprilia Caponord ETV1000 Rally-Raid. Surface ground flat so a nut can be used to lock the bolt in placeLast year the Capo had an advisory on its MOT about play in the rear suspension – not much, just 4-5mm at the back wheel but enough to be picked up. The bearings, pins and seals had all been replaced only about 3-4K miles previously, so I doubted they were the problem and frankly I couldn’t feel anything when riding …. so the investigation was delayed until now.

With another 12K on top, the play hadn’t got any worse so I wasn’t too worried …. until I found the fault. The thread in the shock absorber lower mount was shot. Trying to remove the bolt simply unscrewed the thread the other way – bugger! The bolt is 10.9 high tensile into aluminium at a torque of 45nm which isn’t much, and I know I used a torque wrench to install it last time ……. hmmm.

Aprilia Caponord ETV1000 Rally-Raid. Cleaned linkage and nut/bolt in placeIn the end I carefully ground the thread ‘hump’ down to a nice flat surface and used a Nyloc nut as a replacement. Luckily the bolt is 47mm long and has a reasonable amount of spare thread on which to use a nut and sufficient clearance behind the drag-link. In an ideal world the thread should protrude 1-3 turns past the end of the nut, but in this case it sits flush. I’ll probably see if I can find a 48-50mm bolt to replace the existing one just to be absolutely sure it’s right, a flanged Nyloc nut wouldn’t hurt either … hell I might even take up wire locking again, who knows!

So everything else was cleaned, checked and re-greased. I can now certainly say that the group-buy linkage kit is in perfect condition after a total of approx. 16-17K miles. The play is gone and I just hope the MOT man appreciates my scrapped knuckles!