Tacho/Voltmeter live on the Caponord

Up and running at last
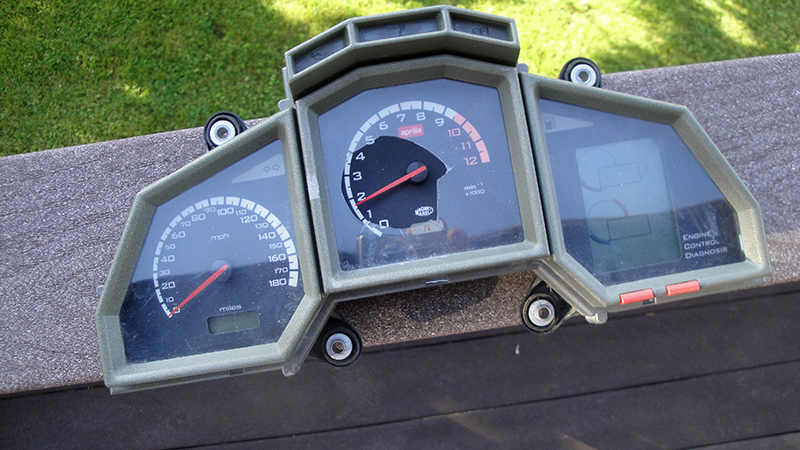
Phase 1 is over, Phase 2 begins …….. yes, the reworked dashboard with voltmeter/tacho and fade-in/fade-out auto-dimming backlighting is off the workbench and finally onto the Caponord. I know it doesn’t look too inspiring at the moment, but it is only a prototype unit for development. The white tacho face is simply a temporary inlay printed on a piece of A4, so it better not get wet!

Arduino Uno V3
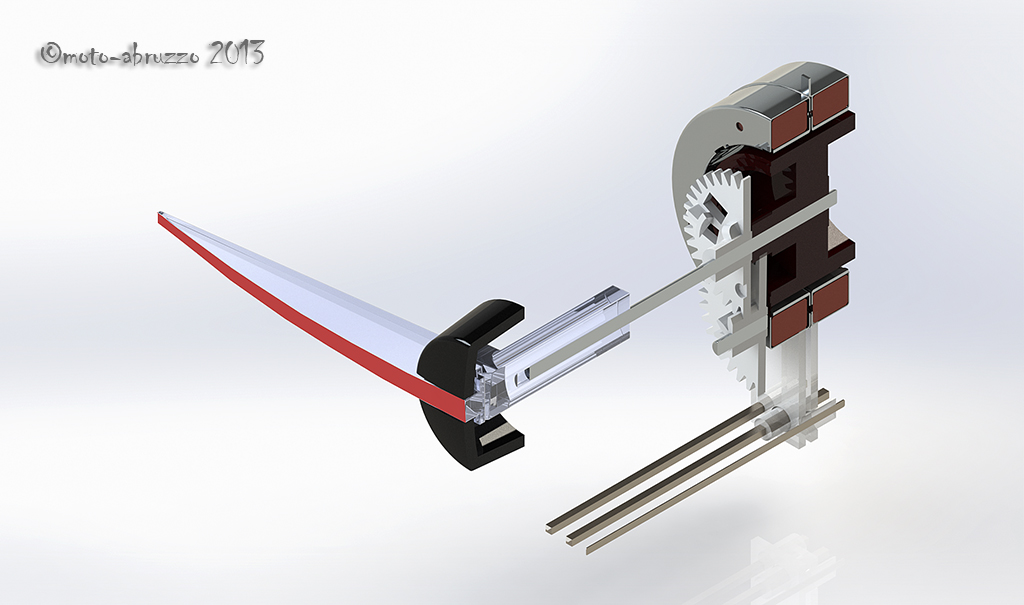
Inside the box lives an Arduino Uno with a homemade interface board that switches and adjusts the signals to/from the dashboard as required. The single connector plugs into an additional fused loom that runs to the battery positive terminal. I’ve tried to build in safeguards against under/over voltage, battery disconnection and reconnection spikes and its own failure with regards to how the dashboard functions, hopefully most if not all eventualities have been covered …. fingers crossed!

The little grey box .... I’ll run this setup for a while and try to iron out any other issues as they crop up, but what then? Well Phase 3 has already started in parallel with Phase 2! A new microcontroller board that uses the same chip, but with a footprint that is an astonishingly small 8% of the Uno has been ordered. Not only is it small, it also loses the peripheral bits and bobs that I don’t need – and that means much lower power consumption. I’m really hoping to get the whole thing inside the dashboard case if possible, but the worst case scenario will mean a small box fixed directly to the back of the dashboard – so no wiring loom or bulky connectors!

Where the ideas originated ..... the Kwak GT & GPZ's of the 1980/90 eraAs well as getting the inlay reprinted with the added voltmeter graphic, I’ve also decided on a little  re-arrangement of the existing graphics and functions. For example, why oh why is a ‘side-stand’ light prime-center of the display when it already has a safety circuit to stop you riding away with the stand down? ….. Magneti Marelli over-egging the pudding I think.

So the side-stand is moving down to the (unused) ABS lamp spot, the low-fuel then moves up to the side-stand lamp and the low-fuel light then becomes the right-hand indicator – as it should have been all along. Yes, a turn repeater for both left AND right hand signals!!!

Left AND right turn repeater lamps!

With all this in the pipeline, I can now source a decent place to have the new inlay card made. I’ve spoken to a couple of companies in the UK already, but I’ll keep looking around for a little while longer …….. do you know anyone you can recommend? If so, I’d like to hear from you.

 Last but not least, here’s another short piece of video with the panel working on the bike.


Power distribution block

Power distribution box 50x50x25Andy (beasthonda on the AF1 forum) has just put these little beauties into production. A nice simple power distribution block that provides four feeds with both 5A and 2A fuses pre-installed. The circuit board is coated in potting compound to prevent moisture and vibration working its charm and the whole thing sits in a box 50 x 50 x 25 …… small enough to mount under the riders seat.

4 fuses - 2x 5A and 2x 2AThe very kind gent that he is, Andy sent me a pre-production one a few months ago and it has proved invaluable in clearing a whole rats-nest of wiring and in-line fuses from the space above and behind the battery. In short, a well made and neat solution to the inevitable side effect of adding extra electrical items to the Caponord.

Andy informs me they will on sale for approx. £25 each including postage & packing, about $40/€29. So if you’re interested, send him a PM from the AF1 forum and tell him moto-abruzzo sent you! 😀

Dashboard upgrades

Evening folks, I thought I’d share this with you as the nights start to draw in and riding gives way to winter tinkering.

I mentioned over on the dashboard page about the upgrades hopefully working by spring next year. Well some of them have come along in leaps and bounds, so I took a snippet of video so you can see a dashboard work-in-progress strutting it’s stuff on the workbench. OK, I know that there’s no voltmeter markings on the inlay yet, just use your imagination for now! It’s actually showing 12.4v ……….

Now while I’m waiting for an oscilloscope to miraculously appear, I’ll leave the board bench testing for a while to see if the code or controller breaks, then fingers crossed, it’s on to the auto-dimming back lighting instead of the three fixed settings of useless, mostly useless and acceptable.

Shorai Power – Pt2

Shorai-LFX21A6-BS12Just a quick post to update on Shorai batteries. As you may remember, I tried a Shorai LFX18A1-BS12 in the Capo and had mixed results. Mixed enough to swap back to a standard battery anyway! In my case, the battery became unpredictable below 12-14c, above that the bike started every time, below that …….. well let’s just say it could take a while!

Anyway, it appears that Shorai have changed the battery specified for the Caponord/Futura to the higher capacity LFX21A6-BS12. They are available via EBay(UK) at about £135+ with postage bringing it to an eye watering sum in the region of £190 … then I’m sure Customs & Excise will want a slice as well!

Shorai-table

After last time, I think I’ll give it a pass. The chunky high-capacity lead-acid YTX14 is doing a sterling job for less than half the price, but if it’s your idea of under-saddle bling then go and fill your boots by all means. 😀

Oh do get a grip ……

Aprilia Caponord ETV1000 Rally-Raid OEM worn heated grips @ 40K milesI can’t believe that the Aprilia heated grips have been on for 5 years, boy how time flies! Over that time they’ve worked perfectly and I can’t justify replacing them any time soon. What I do need to do however, is replace the rubber grip as the originals look tired and are well worn. In truth, they could probably last another year or two as they’re not split yet, just look worn. And I don’t like my RR looking shabby!

I ordered a set of Ariete 02624/L grips from Caprimoto here in Italy and they arrived within 24hrs, fantastic. They cropped up on a thread on the AF1 forum a few months ago as a viable Aprilia Caponord ETV1000 Rally-Raid & Ariete 02624/L gripsalternative, as the Aprilia ones appear to be unavailable except as a complete unit. I’ve written about the fun and games of grip replacement  and thoughts on upgrading the original Aprilia heated grip elements in a separate page. Click here.

Get yer motor running ……..

Aprilia Caponord ETV1000 Rally-Raid dashboard stepper-motorNo, not the mighty V990 Rotax, more the tidily-tiny stepper motor that runs the speedometer and tachometer. An unobtrusive little thing with a hefty replacement price tag of between £30-£50 each.

The B-0410-116-530 stepper motor is also used in a variety of cars from Audi, Fiat, Renault and Citroen. Anyway, I had a duff one on a board and decided to remove it and poke/prod/measure its internals for digital posterity. Here’s a couple of Aprilia Caponord ETV1000 Rally-Raid dashboard stepper motor -sectionimages of the little darling. I’ll be adding a Dashboard page shortly with lots more info on the motor and the circuit board along with plenty of ‘how to’ tips to hopefully save you a few bob on repairs by doing it yourself and avoiding the pitfalls that leave you with an expensive paper-weight!

An extraordinary board meeting

Hot on the previous post and the delivery of the Futura dashboard from Arv, here’s a photo of the hybrid (Franken-Capo) dashboard in the Rally-Raid.

The calibration of the needles was compared to TuneECU (Tacho) and the trusty Garmin GPS (Speedo) and everything is absolutely fine. I’m pleased to say it’s been a complete success and something I can tick off the RR’s wish list. It’s not a very big list, just has some awkward or expensive items on it!

A Futura dashboard from over the pond

Dash1Last winter and again a few weeks ago, I put an advert on the AF1 ‘Aprilia Parts Wanted’ forum for an RST Futura dashboard or inlay and other than a very tedious (and obvious) spammer, it was deathly quiet. I kept scouring Ebay and numerous on-line for-sale sites but it seemed like the world’s supply of Futura dashboards had vanished into thin air ……… until Arv (Picky) sent me a PM through the Aprilia forum.

He had a Futura dashboard that didn’t work and had a broken lens but was fine in all other respects. This sounded just what I was looking for because in reality I ONLY need the inlay anyway. So we swapped emails and Arv sent photo’s and a video. Total cost …… p&p only, I could have the dashboard for free!! USPS said 6-10 working days …. it was on my doorstep in 5, now that IS service. Read it and weep DHL!!!!!  👿

And so I’d like to thank Arv, not only for his generosity and honesty, but for getting the thing packed and away in the mail before I’d even got the payment to him. Arv it turns out, hails from White Plains, New York and fills his days with computer wizardry and his spare time travelling on his beautifully sorted Futura with is wife.

Today I’ve fitted a small piece of his Futura into my hybrid dashboard and as I finished the job off, I felt it was also fitting that a part of his bike had found a new lease of life and returned home to Italy. Arv you are a credit to yourself, your family and the AF1 community and although we’ve never met, or spoken, one day on that round-the-world trip I’d like to buy you a cold beer and shake your hand.

Making connections

Aprilia Caponord ETV1000 Rally-Raid ASL 606-05PC-HE connectorHooking up the netbook to the ECU when datalogging has always been a pain. Seats off, fumble around for the Molex connector, run the cable under the seats, refit the seats …… and away we go. So when I saw a neat little MIL style connector that Andy has fitted to his Capo, I couldn’t help asking about it.

Turns out it’s made by Deutsch Autosport and they make a whole range of high quality connectors specifically for the motorsport industry. Here’s a link to the catalogue. Anyway, all-round nice guy that he is, Andy made me a chassis socket and plug assembly with 300mm of loom at each end. Not only that, he popped them in the post to Italy … and they arrived a couple of days ago. And I must say ….. WOW! ….. beautifully machined and fully waterproof with a nice machined cap to keep the greeblies out.

So now I’ve reworked my old TuneBoy cable and installed the connector on the dash. I’ve used shielded cable back to the original molex plug to reduce interference on the data lines and it all works fine.

So it only remains to say a big thank you to Andy for doing this for me. I owe you one! Now if you’re thinking of hot-footing it over to the AF1 forum to send Andy a PM – don’t. This was a one-off kindness and he won’t be making any more, so please don’t ask.

My very own total Eclipse…..

When I got back from the UK just after Christmas I set about installing the new Eclipse-8 battery monitor on the Capo. You may remember from a previous post that I fitted a 5mm LED battery monitor from Sparkbright a few month ago and loved it (previous post here). In December Andrew very kindly sent me an Eclipse-8 as a sample so I could evaluate it – thanks again Andrew!

Aprilia Caponord ETV1000 Rally-Raid - Sparkbright multi-state auto dimmng battery monitor

What’s the difference between them? Well firstly, it’s only available as an 8mm or 10mm unit, no 5mm version as yet. Secondly – and this is the kicker – it’s also auto-dimming, changing it’s brightness depending on the prevailing light conditions, without using a separate photo-sensor to do it. Here’s a Sparkbright video of it in action.


So does it work? Short answer – yes, VERY well! I installed it in the same place I’d had the 5mm unit, just drilling the hole a little bigger to accommodate it. The Eclipse-8 has the circuit board attached directly to the LED, so only two wires and no circuit board in the loom to find a home for. The board is very compact and once the LED is inserted into the mounting clip, it is hardly visible. The length of wire supplied was ample to attach to the battery and earth points I chose in the bikes wiring.

The Caponord was bolted back together and fired up, the LED quickly changing from orange to green as the rec/reg did its thing and the voltage rose in the loom. In the strong daylight of the barn the LED glowed brightly, but put a hand over it and it very quickly dropped its output in response. All well and good, but would it be effective when put to use in the real world?

Well I’ve covered about 700 miles through January and early February in all weathers and lighting conditions and the Eclipse-8 has certainly lived up to my expectations. For example, here along the Adriatic, the A14 Autostrada weaves its way along the cost through numerous dimly lit tunnels. Jumping from bright sunlight to twilight and back gives the unit a good workout and each and every time it switches very rapidly – I’m guessing in a few milliseconds, but certainly fast. At night-time the unit operates primarily at it lowest output and is never distracting, sometimes increasing in  brightness as I pass under a sequence of street lamps just to let me know it’s still doing its thing!

So are there any downsides? Yes, but not as a result of anything done by Sparkbright. 8mm LED clips it seems are only available in convex and not concave style. Great for increasing the angle of visibility ( not important from the saddle) but also increasing the susceptibility of the LED to being ‘washed-out’ by direct sunlight and becoming difficult to see. As it is, there is a simple partial fix. Drop the LED further down the clip and glue it in place. I dropped the LED so its top was flush with the clip – a couple of millimetres I guess and this has made a world of difference. Now only the most direct sunlight affects readability and I can live with that!

Bottom line, the Eclipse-8 is a simple all-weather battery monitor for day/night use on a motorcycle – no more, no less. And it is doing the job perfectly.

Contact details  E-mail: [email protected]    or  Tel: 0141 557 5277

Other than my initial purchase of the 5mm unit and sample Eclipse-8 supplied by Sparkbright, I have no affiliation to them. I’m simply offering my own review of products I believe to be useful and cost effective. It’s my unbiased opinion, if you buy one and don’t like it – tough. Don’t come running to me! Is that a disclaimer?